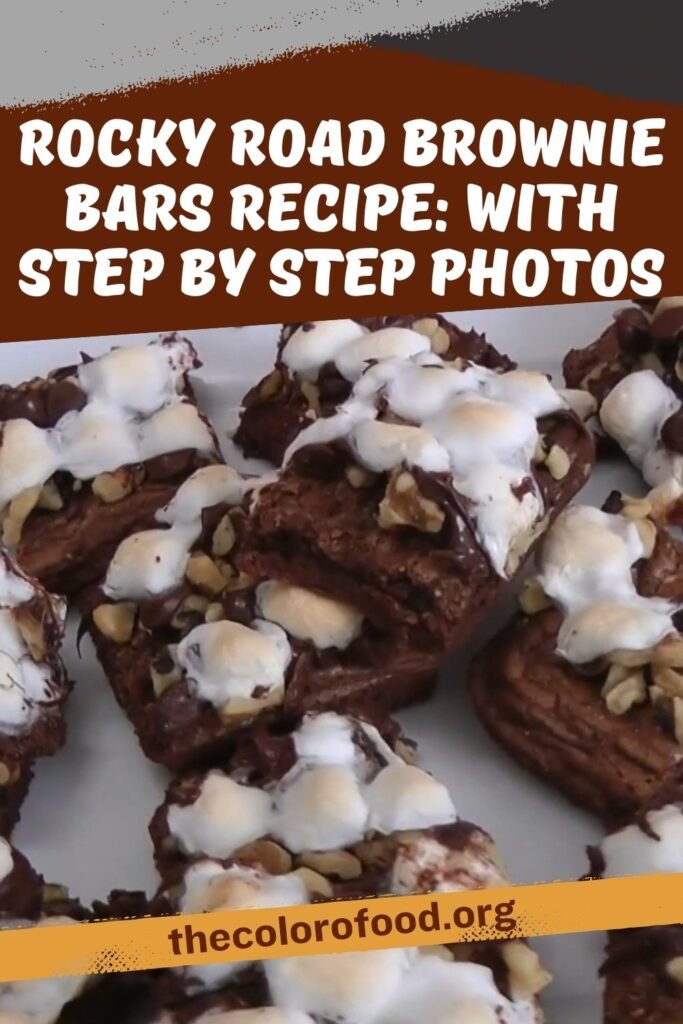
Rocky Road Brownie Bars offer a decadent blend of chewy brownie base, gooey marshmallows, melted chocolate, and crunchy walnuts. This recipe delivers irresistible texture and flavor in every bite.
Ingredients
Here is the complete list of ingredients needed for these Rocky Road Brownie Bars.
- 2 cups of Semisweet Chocolate Chips
- 1 1/4 cups of All Purpose Flour
- 2 Tbsp of Cocoa Powder
- 1 ½ tsp of Baking Powder
- ¾ cup of Granulated Sugar
- 1/4 cup of Brown Sugar
- 6 Tbsp of Unsalted Butter, at room temperature
- Pinch of Salt
- 1 tsp of Vanilla Extract
- 2 Eggs
- 2 cups of Mini Marshmallows
- 1 ½ cups of Walnuts, coarsely chopped
1. Essential Equipment Guide
- 9×13-inch baking pan
- Parchment paper
- Microwave-safe bowl
- Large mixing bowl
- Whisk or spatula
- Small bowl for dry ingredients
- Oven
- Toothpick for testing
- Butter knife for edges
2. Timing and Servings
3. Preheat and Prepare Pan
Start by preheating your oven to 375 degrees Fahrenheit to ensure even baking from the beginning. Take a 13×9-inch baking pan and spray it generously with non-stick cooking spray, focusing on all corners and sides to prevent any sticking issues later. Cut a piece of parchment paper to fit the bottom of the pan exactly, pressing it down smoothly so it lies flat without wrinkles that could affect the brownie layer’s evenness.
Lay the parchment paper into the sprayed pan, ensuring it adheres well to the bottom. This double preparation with spray and paper makes removal effortless after cooling, preserving the perfect edges of your bars. Give the pan a gentle tap on the counter to release any air bubbles under the paper, setting up for a flawless base.
4. Melt the Chocolate
Measure out 1 cup of the semisweet chocolate chips into a small microwave-safe bowl, reserving the remaining cup for later topping. Place the bowl in the microwave and heat in 30 to 45-second intervals, stirring after each burst to promote even melting and avoid scorching.
Check the chocolate frequently; it should become smooth and fully melted without any solid bits remaining. Once melted, set the bowl aside on the counter to cool slightly, which prevents it from cooking the eggs when added to the wet mixture later. This step infuses rich chocolate flavor right into the brownie base.
5. Mix Dry Ingredients
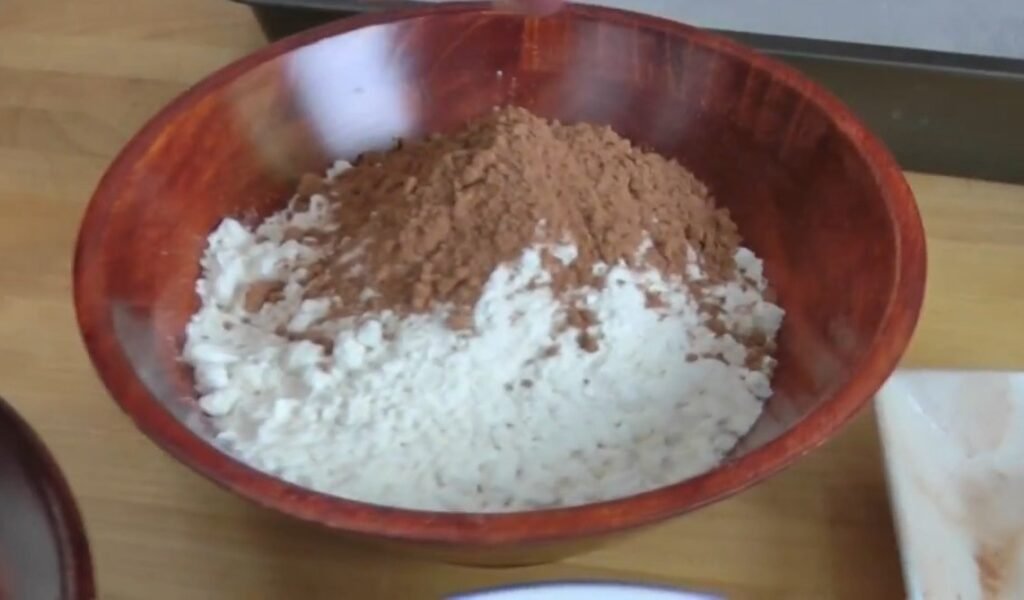
In a small bowl, combine the 1 1/4 cups of all-purpose flour, 2 tablespoons of cocoa powder, 1 ½ teaspoons of baking powder, and a pinch of salt. Use a spoon or whisk to stir these together gently until evenly distributed, breaking up any lumps in the cocoa for consistent texture.
Do not overmix at this stage; a quick incorporation suffices to blend the leavening agents and dry components uniformly. Set this dry mixture aside near your workspace for easy access during the next steps, keeping everything organized for smooth assembly.
6. Cream Butter and Sugars
Take a large mixing bowl and add the 6 tablespoons of unsalted butter at room temperature, ¾ cup of granulated sugar, and ¼ cup of brown sugar. Using a whisk or sturdy spatula, cream these ingredients together vigorously until light, fluffy, and well combined, which usually takes 2 to 3 minutes of effort.
The mixture should pale in color and increase slightly in volume as air incorporates, creating a tender crumb in the final brownies. Scrape down the sides of the bowl occasionally with the spatula to ensure no sugar grains remain untouched.
7. Add Eggs and Vanilla
Crack the 2 eggs into the creamed butter and sugar mixture one at a time, whisking thoroughly after each addition to fully emulsify. Pour in the 1 teaspoon of vanilla extract and continue whisking until the batter achieves a creamy, homogeneous consistency with no visible egg streaks.
This step builds the emulsion that holds the brownie structure together, so whisk steadily for about 1 minute. The batter will look smooth and glossy, ready to embrace the chocolate and dry ingredients.
8. Incorporate Melted Chocolate
Pour the slightly cooled melted chocolate into the wet egg mixture, leaving a small amount behind in the bowl if desired for a quick taste. Whisk briskly until the chocolate fully integrates, turning the batter a deep, uniform chocolate hue without any streaks or separation.
Work quickly here to maintain the chocolate’s warmth without overheating the eggs. The result is a velvety base that promises fudgy brownies.
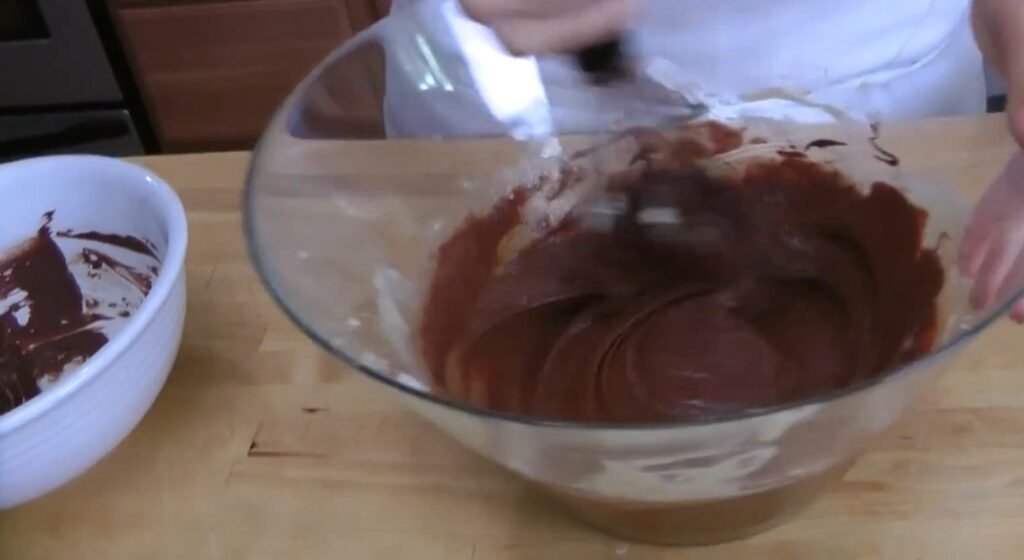
9. Combine Dry and Wet Mixtures
Add the prepared dry ingredients to the chocolate wet batter all at once. Using a spatula or whisk, fold them in with gentle strokes, mixing just until no dry flour pockets remain and the batter comes together smoothly.
Avoid overmixing, as this develops gluten and leads to tough brownies; stop as soon as incorporated, even if a few streaks linger. The batter will thicken into a scoopable consistency perfect for spreading.
10. Spread Batter in Pan
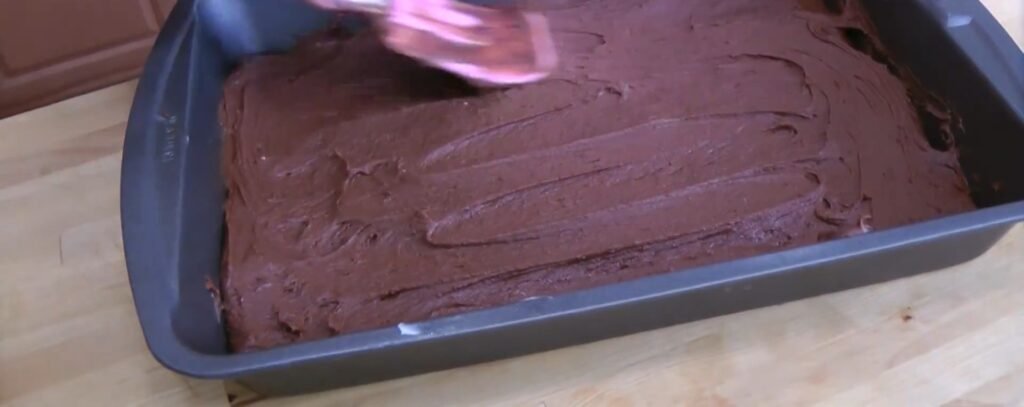
Transfer the brownie batter into the prepared 13×9-inch pan, using the spatula to scrape every bit from the bowl. Spread it evenly across the bottom with the spatula, pressing gently to fill corners and create a uniform ½-inch thick layer without peaks or thin spots.
Smooth the top by dipping the spatula in warm water for easier gliding, ensuring even baking. Wipe excess batter from the spatula edges to avoid waste.
11. First Bake
Place the pan in the preheated 375-degree oven on the center rack for 18 to 20 minutes. Test doneness by inserting a toothpick into the center; it should come out with moist crumbs or slightly sticky, not wet batter, indicating perfect fudginess.
Rotate the pan halfway through if your oven heats unevenly, promoting uniform cooking. Remove promptly once done to avoid overbaking the base.
12. Add Toppings Quickly
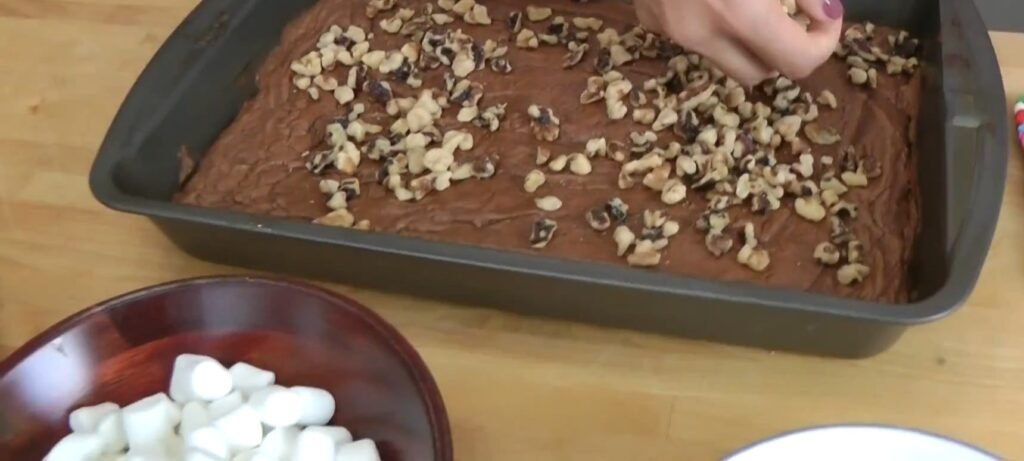
Working swiftly while the brownie layer remains hot, sprinkle the 1 ½ cups of coarsely chopped walnuts evenly over the surface, distributing nuts uniformly for crunch in every bite. Follow with the remaining 1 cup of semisweet chocolate chips, scattering them to melt partially from residual heat.
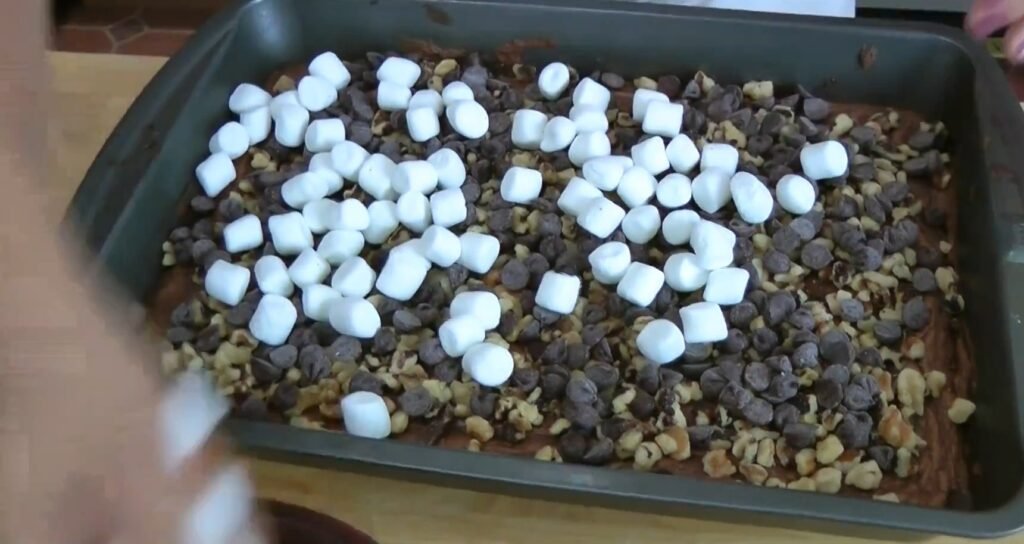
Finally, evenly distribute the 2 cups of mini marshmallows across the top, pressing lightly so they adhere. Coverage should be generous but not piled too high to allow melting.
13. Second Quick Bake
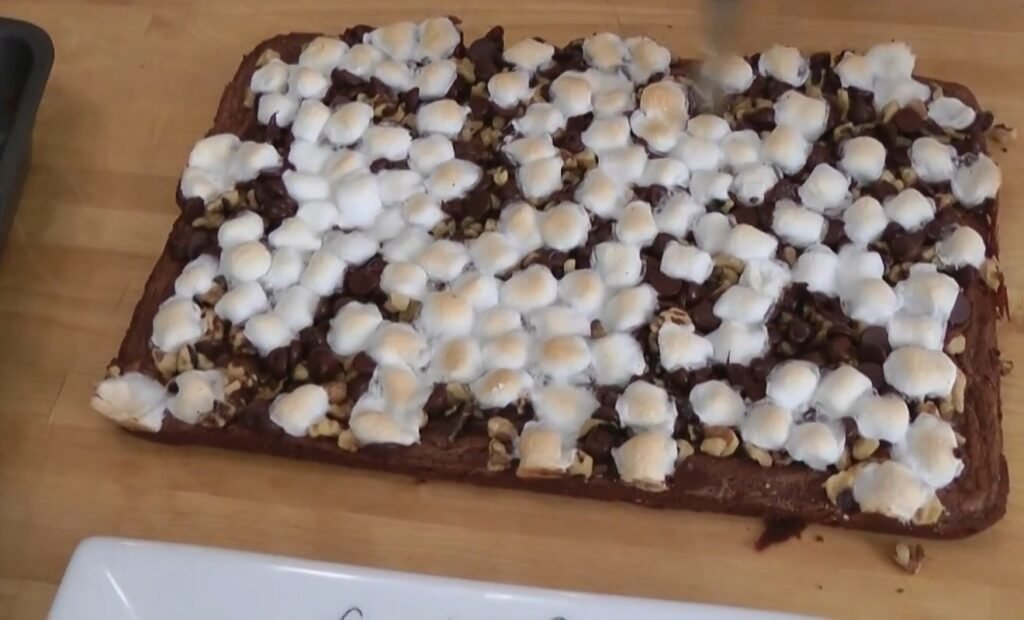
Return the topped pan to the 375-degree oven for exactly 2 minutes, or until the marshmallows puff and begin to melt softly while the chocolate chips soften without fully liquifying. Watch closely to prevent burning the delicate toppings.
This brief bake sets the rocky road elements into gooey perfection. Remove and place on a wire rack immediately.
14. Cool Completely
Allow the bars to cool in the pan on a wire rack for at least 30 minutes, ideally 35 to 60 minutes until firm enough to cut without squishing the toppings. Cooling firms the brownie base while keeping marshmallows stretchy.
Patience here ensures clean slices; rushing leads to messy breaks. For best results, cool fully at room temperature before refrigeration if needed.
15. Release and Cut
Run a butter knife around the pan edges to loosen any stuck bits, lifting gently with the parchment overhang as handles. Transfer to a cutting board and slice into bars or squares using a sharp knife wiped clean between cuts for neat edges.
Store leftovers in an airtight container at room temperature for up to 3 days, or freeze wrapped individually for longer enjoyment.
Preparation Tips
- Always use room temperature butter for creaming sugars to achieve maximum volume and tenderness in the brownie base.
- Cool melted chocolate slightly before adding to eggs to prevent curdling, ensuring a smooth batter every time.
- Measure flour by spooning into the cup and leveling with a knife, avoiding packing which makes brownies dense.
- Chop walnuts coarsely for texture contrast; toast them lightly beforehand if you prefer deeper nut flavor, but skip for the classic taste.
- Use high-quality semisweet chips as they form the flavor backbone; generic brands may not melt as evenly.
- Test brownie doneness with toothpick at multiple center spots since oven hotspots vary.
- For gooier marshmallows, slightly underbake the second step and cool slowly.
- Line pan with enough parchment overhang for easy lifting without breakage.
- Whisk wet ingredients longer for better emulsion, leading to fudgier results.
- Customize nut amount based on preference, but even distribution prevents soggy spots.
Nutritional Information
| Nutrient (per serving, approx. 1 bar / 24 servings) | Amount |
|---|---|
| Calories | 220 |
| Total Fat | 12g |
| Saturated Fat | 5g |
| Carbohydrates | 28g |
| Sugars | 20g |
| Protein | 3g |
Values estimated based on ingredients; actual varies by portion size.
Pairings
- Vanilla ice cream for cooling contrast.
- Fresh berries to cut richness.
- Coffee or milk for beverage match.
- Whipped cream dollop.
Variations
- Substitute pecans for walnuts.
- Add peanut butter chips with chocolate.
- Use dark chocolate chips for intensity.
- Mix in coconut flakes atop marshmallows.
- Gluten-free flour swap for dietary needs.