Mini Oreo cheesecakes are a simple, bite sized dessert featuring a whole Oreo as the base and a creamy Oreo studded cheesecake filling baked in a standard muffin tin. This recipe closely follows the original instructions while expanding each phase into clear, numbered steps so you can bake with confidence.
Ingredients
- 16 Oreos
- 2 packages cream cheese, 8 oz each, softened at room temperature
- 2 Tbsp sour cream
- 3/4 cup granulated sugar
- 1 tsp vanilla bean paste or vanilla extract
- 2 eggs
- Small pinch of salt
1. Prepare your pan and cookies
Start by heating your oven to 350 degrees so it reaches the right temperature by the time the batter is ready. Lightly spray a standard non stick muffin tin with baking spray, making sure you coat the base and sides of each cup so the cheesecakes release easily later.
Place one whole Oreo cookie in the bottom of each muffin cup to act as the crust, centering it so the cheesecake bakes evenly around it. For this recipe, you will use 12 Oreos as bases if your pan makes 12 mini cheesecakes, and you will reserve the remaining cookies to crumble into the batter.
Take about 4 Oreos from the total and place them in a small resealable plastic bag. Use a rolling pin or the bottom of a skillet to crush them into small crumbs, leaving a mix of fine crumbs and a few slightly larger bits for texture. Set this bag of crushed cookies aside; you will fold these into the cheesecake batter at the end so they stay distinct rather than turning the whole mixture gray.
2. Soften and beat the cream cheese
Make sure your cream cheese is fully softened at room temperature before you begin mixing, since cold cream cheese tends to form lumps that are hard to beat out later. Place the softened cream cheese in the bowl of a stand mixer fitted with a paddle attachment, or use a large mixing bowl and a hand mixer if you prefer.
Beat the cream cheese by itself on medium speed for about one minute so it becomes smooth, pliable, and free of obvious chunks. This brief head start helps the sugar and other ingredients blend in seamlessly and leads to a creamier finished cheesecake without overworking the batter.
3. Add sugar, sour cream, eggs, vanilla, and salt
Once the cream cheese is smooth, add the granulated sugar and the small pinch of salt to the bowl. The sugar will sweeten the filling while the salt subtly sharpens the flavors and keeps the cheesecake from tasting flat.
Next, add the sour cream, vanilla bean paste or vanilla extract, and both eggs to the same bowl. The sour cream brings a gentle tang and contributes to a silky, soft texture, while the vanilla rounds out the flavor and the eggs provide structure so the cheesecakes set properly in the oven.
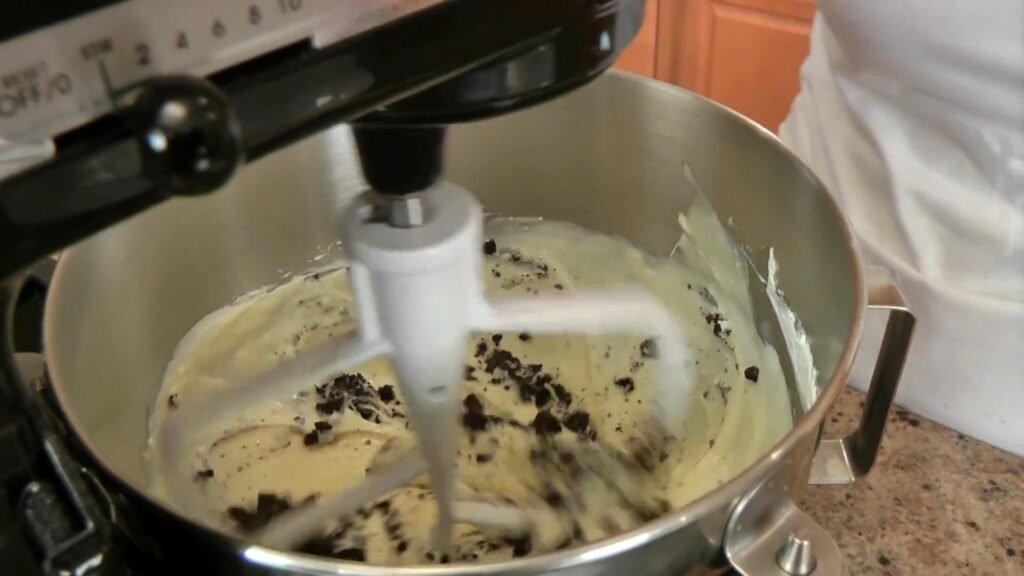
Mix everything together on medium speed for about 3 minutes, pausing once or twice to scrape down the sides and bottom of the bowl with a spatula. You are aiming for a creamy, thick batter that looks smooth and glossy, with no visible streaks of egg or clumps of cream cheese.
4. Fold in the crushed Oreos
Once the base cheesecake mixture is smooth, add the reserved bag of crushed Oreo pieces. Switch the mixer to a very low speed, or use a spatula, and blend the crumbs in just until they are evenly dispersed throughout the batter.
Avoid mixing too long at this stage because overmixing can break the pieces down too much and tint the whole batter gray instead of leaving attractive specks. If you prefer a cleaner looking cheesecake with only the whole Oreo at the bottom, you can omit the crushed cookies entirely and keep the filling plain.
5. Fill the muffin tin

Use an ice cream scoop or a large spoon to divide the cheesecake batter among the muffin cups, filling each almost to the top while covering the Oreo base completely. Using a scoop helps ensure each mini cheesecake has the same amount of filling, which helps them bake at the same rate and look uniform.
Gently tap the muffin tin on the counter once or twice to help the batter settle around the cookies and release any larger air bubbles trapped inside. If you see any obvious pockets of crumbs clumped together, you can lightly smooth the tops with the back of a spoon so the surface bakes evenly.
6. Bake the mini cheesecakes
Place the filled muffin tin on the center rack of your preheated 350 degree oven. Bake for about 15 minutes, keeping an eye on the top surface rather than relying only on the clock, since oven temperatures can vary.
The mini cheesecakes are done when the tops look just set and no longer appear shiny or wet, but the very center may still have a slight wobble if you nudge the pan. Avoid baking until they are fully firm since that can lead to a dry, cracked texture once they cool; residual heat will continue to set them as they rest.
7. Cool and chill before serving
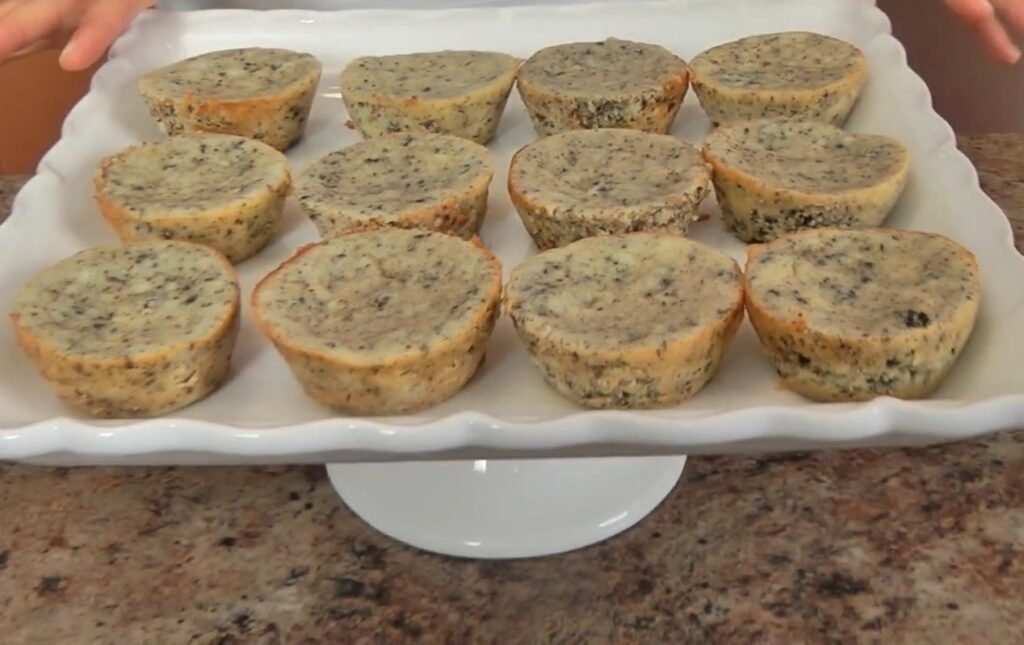
Remove the muffin tin from the oven and place it on a cooling rack so air can circulate around the pan. Let the cheesecakes cool at room temperature in the pan for about 20 minutes, which allows them to firm up gradually and reduces the risk of sinking or cracking.
After they have cooled slightly, transfer the entire pan to the refrigerator and chill the mini cheesecakes for about 3 hours so they can set completely. Once chilled, use a small offset spatula or butter knife to loosen the edges if needed, then gently lift each mini cheesecake from the tin and place on a serving plate.
These keep well in the fridge for several days, and the texture actually improves slightly as they sit and fully mature. If you plan to transport them, keep them cold as long as possible so the filling stays firm and the Oreo base does not soften too much.
8. Optional notes on liners and texture
For a slightly different finish, you can line each muffin cup with paper cupcake liners before adding the Oreo and batter instead of spraying the tin. Using liners gives you a paler sided cheesecake since the batter is not directly in contact with the hot metal surface and also makes the mini cheesecakes easier to remove and serve individually.
If you skip liners and bake directly in the sprayed tin, the sides may take on a light golden tint, and the edges will feel just a bit firmer while the centers stay creamy. Both approaches work well, so you can choose based on whether you prefer a more rustic edge or a neatly wrapped, party ready look.
Tips for perfect mini Oreo cheesecakes
- Bring cream cheese, sour cream, and eggs fully to room temperature so the batter mixes smoothly and bakes evenly without lumps or streaks.
- Crush the Oreos for the filling into small pieces, not dust, so you get defined bits of cookie and cream throughout instead of a uniformly gray batter.
- Use an ice cream scoop to portion the batter; this keeps all the cheesecakes the same size and helps them bake at the same pace.
- Avoid overbaking; take the cheesecakes out when the tops are just set and the centers still have a slight jiggle to maintain a creamy texture after chilling.
- Cool the cheesecakes first at room temperature, then chill in the fridge to minimize cracking and to allow the flavor and texture to fully develop.
- If you like a less sweet bite, choose regular Oreos rather than flavored varieties and keep the added sugar as written so the tang of the sour cream balances the sweetness.
- For cleaner edges when serving, chill the cheesecakes thoroughly and use a thin spatula to ease them from the pan, wiping the utensil between each one if necessary.
9. Essential equipment guide
- Standard 12 cup muffin tin or cupcake pan
- Non stick baking spray
- Mixing bowls (large and medium)
- Stand mixer with paddle attachment or hand mixer
- Silicone spatula or wooden spoon
- Resealable plastic bag for crushing cookies
- Rolling pin or heavy skillet for bashing Oreos
- Ice cream scoop or large spoon for portioning batter
- Wire cooling rack
- Small offset spatula or butter knife for releasing cheesecakes
10. Nutritional information (approximate per mini cheesecake)
These values are approximate and will vary based on the specific brands of ingredients you use and the exact yield, assuming about 12 mini cheesecakes.
| Nutrient | Approximate amount per serving |
|---|---|
| Calories | 280–310 kcal |
| Total Fat | 20–22 g |
| Saturated Fat | 11–13 g |
| Carbohydrates | 22–25 g |
| Sugars | 17–19 g |
| Protein | 4–5 g |
| Sodium | 160–220 mg |
11. Pairings
- Serve chilled with a drizzle of chocolate sauce for a richer dessert plate.
- Add a dollop of lightly sweetened whipped cream and a small Oreo on top for a bakery style finish.
- Pair with fresh berries such as strawberries or raspberries to cut through the richness with a bit of tartness.
- Enjoy alongside coffee, espresso, or a glass of cold milk for a classic cookies and cream combination.
12. Variations
- Skip the crushed Oreos in the batter and keep only the whole cookie base for a smooth vanilla cheesecake bite with a crisp chocolate cookie crust.
- Swap vanilla extract for another flavor extract like almond or orange for a subtle twist while keeping the Oreo base the same.
- Top each chilled mini cheesecake with chocolate ganache or a fudge sauce layer if you enjoy a richer, more decadent finish.
- Use flavored Oreo varieties for the base and crumbs, such as mint or birthday cake, to customize the flavor profile while following the same mixing and baking method.
13. Prep time, cook time, servings
- Prep time: About 10 minutes, including crushing the cookies, softening the cream cheese in advance, and mixing the batter.
- Cook time: About 15 minutes in a 350 degree oven, plus chilling time of around 3 hours for the cheesecakes to fully set.
- Servings: Makes approximately 12 mini cheesecakes, depending on how full you fill each muffin cup.