

Low Fat Cheesecake Trifles offer a quick, indulgent treat that’s light yet satisfying. This no-bake dessert layers creamy yogurt with tart lemon and fresh fruit for a balanced flavor profile.
Ingredients
Here is the complete list of ingredients needed for this recipe, scaled for easy preparation:
- 8 oz of low fat Vanilla Greek Yogurt
- 1 Tbsp of Lemon Curd
- 6 Digestive Biscuits or any other kind of cookie you have on hand
- Fresh Raspberries
These simple components come together in minutes to create individual servings that feel decadent without the heaviness of traditional cheesecake.
Prep Details
- Prep Time: 10 minutes
- Cook Time: 0 minutes (no-bake)
- Servings: 2 trifles
This recipe is designed for speed, making it ideal for spontaneous desserts or last-minute gatherings.
Essential Equipment Guide
- Small mixing bowls
- Spoon or spatula for stirring
- Measuring spoon
- Clear trifle glasses or small jars (about 8 oz capacity each)
- Knife or food processor for crushing biscuits
Step 1: Prepare the Crumb Base

Start by taking the 6 Digestive Biscuits and placing them into a sturdy zip-top bag or directly into a small food processor. Crush them until you achieve a coarse crumb texture, similar to wet sand. This forms the sturdy foundation for your trifle, providing a satisfying crunch that contrasts beautifully with the creamy layers above.
If using a bag, seal it tightly and use a rolling pin or the flat side of a meat mallet to gently pound and roll over the biscuits until evenly crumbled. Avoid over-processing into fine dust, as some larger pieces add texture and prevent the base from becoming soggy too quickly. Set aside about one-third of the crumbs for sprinkling on top later, reserving the rest for the bottom layer. This step takes just 2 minutes and ensures even distribution in each glass.
Step 2: Mix the Creamy Filling

In a small mixing bowl, scoop out the 8 oz of low fat Vanilla Greek Yogurt. Add 1 Tbsp of Lemon Curd right into the center of the yogurt. Use a spoon or small spatula to gently fold the lemon curd into the yogurt, swirling it to create beautiful ribbons of bright yellow throughout the creamy white base. Do not overmix; aim for a marbled effect where pockets of tart lemon curd remain visible against the smooth yogurt.
This technique preserves the distinct flavors, allowing the tangy lemon to burst forth in each bite while the vanilla yogurt provides a cooling, velvety backdrop. Taste a small bit to ensure the balance is right; the yogurt’s subtle sweetness tempers the curd’s sharpness. If your yogurt seems too thick, a quick stir for 30 seconds will loosen it perfectly for layering. Cover loosely if not assembling immediately to keep it chilled.
Step 3: Layer the First Crumbs
Select two clear trifle glasses or small jars for an elegant presentation that showcases the layers. Divide half of the prepared biscuit crumbs evenly between the two glasses, using about 1.5 to 2 tablespoons per glass. Press the crumbs gently but firmly into the bottom using the back of a spoon or your fingers. This compaction creates a solid base that holds up the weight of the upper layers without shifting.
Tap the glasses lightly on the counter to settle the crumbs and remove any air pockets, ensuring stability. The digestive biscuits’ subtle sweetness and graham-like flavor pair ideally here, mimicking a traditional cheesecake crust but with far less effort and calories.
Step 4: Add the Yogurt Layer

Spoon half of the yogurt-lemon mixture over the crumb base in each glass, distributing it equally for uniform height. Use the spoon to smooth the top gently, creating a flat surface for the next layer. The yogurt should fill about one-third to half of the glass, depending on your container size, leaving ample room for fruit and topping.
This creamy layer introduces the dessert’s core indulgence, with the low-fat Greek yogurt offering protein-rich creaminess that satisfies without guilt. As it sits briefly, it softens the crumbs underneath just enough for flavor melding, but the pressing from Step 3 prevents sogginess.
Step 5: Incorporate Fresh Raspberries

Rinse 8 to 10 fresh raspberries under cool water and pat them dry with a paper towel to remove excess moisture. Arrange 4 to 5 raspberries per glass, pressing them lightly into the yogurt layer around the edges for visual appeal and scattering a few in the center.
Their vibrant red hue pops against the pale yogurt, signaling freshness and tartness. Do not chop the berries; keep them whole to release juices gradually as the trifle sets, infusing natural sweetness and a jammy texture. This fruit layer adds brightness, cutting through the richness and providing antioxidants for a healthier twist on dessert.
Step 6: Repeat the Crumb Layer
Sprinkle the remaining biscuit crumbs over the raspberries in each glass, using about 1 tablespoon per serving. This middle crumb layer acts as a buffer, separating the fruit’s moisture from the final yogurt addition and building textural complexity. Distribute evenly to cover the berries completely, then press down lightly once more. The repetition reinforces the crust-like element, ensuring every spoonful delivers crunch amid the softness.
Step 7: Finish with Yogurt Topping

Add the remaining yogurt-lemon mixture on top of the second crumb layer, dividing it between the glasses. Smooth the surface with a spoon for a polished finish, and create gentle swirls if desired to highlight the marbling. This top layer seals in the flavors, providing a clean, creamy cap that invites digging in. Chill the assembled trifles in the refrigerator for at least 15 minutes, or up to 2 hours, to allow flavors to harmonize and the structure to firm up slightly.
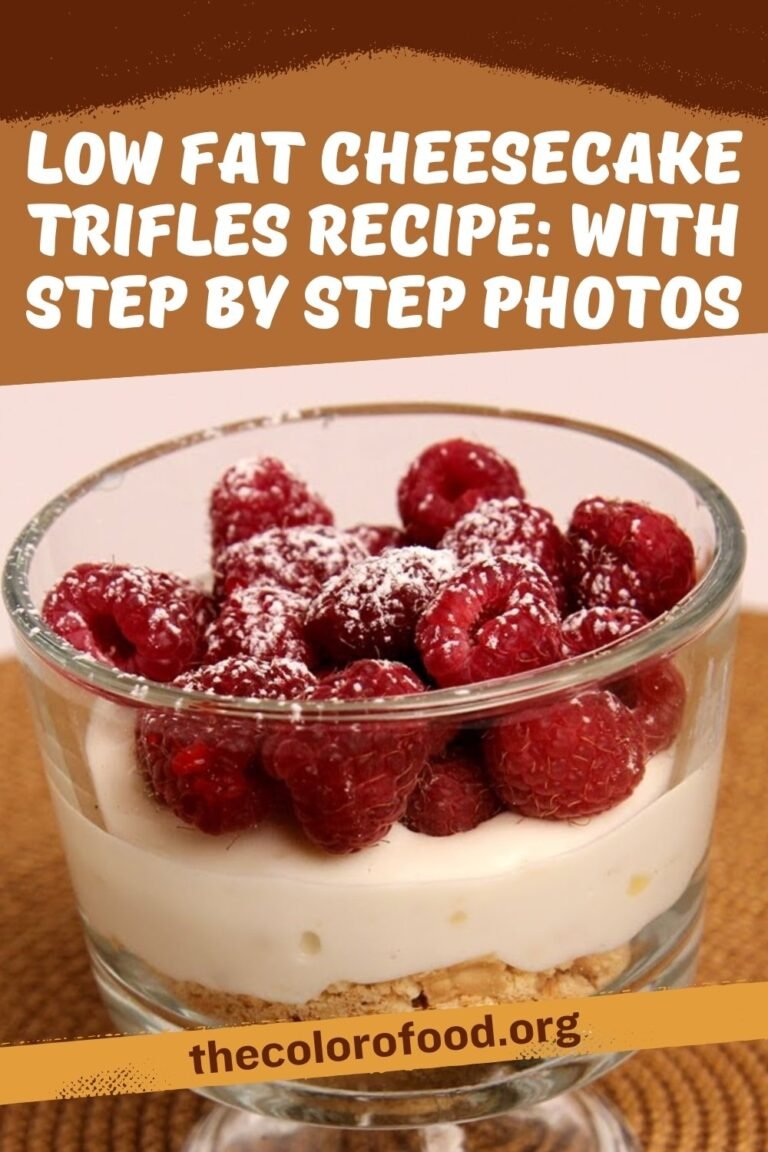
Step 8: Garnish and Serve
Just before serving, add the reserved biscuit crumbs on top of each trifle for a fresh crunch. Place 2 to 3 additional fresh raspberries upright in the center, and if available, a tiny dollop of extra lemon curd for shine. Serve chilled with long spoons to reach all layers easily. The trifles hold shape well, making them portable for picnics or parties.
Nutritional Information
Approximate values per serving (1 trifle, based on standard nutritional data for low-fat ingredients):
| Nutrient | Amount per Serving | % Daily Value* |
|---|---|---|
| Calories | 280 | 14% |
| Total Fat | 6g | 8% |
| Saturated Fat | 2g | 10% |
| Cholesterol | 15mg | 5% |
| Sodium | 220mg | 10% |
| Total Carbohydrates | 42g | 15% |
| Dietary Fiber | 4g | 14% |
| Sugars | 20g | – |
| Protein | 12g | 24% |
*Percent Daily Values are based on a 2,000 calorie diet. Values estimated for low-fat yogurt and digestive biscuits.
Pairings
- Fresh mint leaves for a herbal lift.
- Whipped coconut cream for extra lightness.
- Shortbread cookies on the side for more crunch.
- Herbal tea like chamomile to complement the lemon.
- Sparkling water with berry infusion for a refreshing drink.
Variations
- Swap raspberries for blueberries for milder tartness.
- Use lime curd instead of lemon for a tropical twist.
- Add crushed graham crackers for a classic cheesecake vibe.
- Incorporate a sprinkle of chopped pistachios for nutty texture.
- Make it chocolatey with cocoa-dusted crumbs and dark chocolate shavings.
Tips
- Choose firm, ripe raspberries to avoid excess juice that could make layers runny. Select berries that are plump and deep red for peak flavor and texture in every bite.
- For best marbling, fold the lemon curd into the yogurt in slow, deliberate strokes rather than vigorous stirring, preserving distinct swirls that enhance visual appeal and taste contrast.
- If digestive biscuits are unavailable, graham crackers or vanilla wafers work perfectly as substitutes, offering similar buttery notes and crumbly consistency without altering the recipe’s balance.
- Assemble trifles no more than 2 hours ahead to maintain crunch; longer chilling softens crumbs excessively, diminishing the textural play that’s key to this dessert’s charm.
- Scale up easily for crowds by multiplying ingredients evenly and using larger glasses; individual servings prevent overeating while looking impressive at gatherings.
- Taste the yogurt-curd mix before layering and adjust with a squeeze of fresh lemon juice if more zing is needed, ensuring customized brightness.
- For a dairy-free version, substitute coconut or almond yogurt, selecting unsweetened varieties to mimic the tang of Greek yogurt closely.
- Press crumbs firmly but not too hard to avoid compacting them into a dense puck; gentle tapping settles them ideally for stability.
- Garnish right before serving to keep toppings fresh and colors vibrant, elevating presentation without extra effort.
- Store leftovers covered in the fridge for up to 24 hours; stir gently before eating if separation occurs for restored creaminess.
Low Fat Cheesecake Trifles Recipe: With Step By Step Photos
Low Fat Cheesecake Trifles offer a quick, indulgent treat that’s light yet satisfying. This no-bake dessert layers creamy yogurt with tart lemon and fresh fruit for a balanced flavor profile.
- Total Time: 10 Mins
Ingredients
- 8 oz of low fat Vanilla Greek Yogurt
- 1 Tbsp of Lemon Curd
- 6 Digestive Biscuits or any other kind of cookie you have on hand
- Fresh Raspberries
Instructions
Start by taking the 6 Digestive Biscuits and placing them into a sturdy zip-top bag or directly into a small food processor. Crush them until you achieve a coarse crumb texture, similar to wet sand. This forms the sturdy foundation for your trifle, providing a satisfying crunch that contrasts beautifully with the creamy layers above.
If using a bag, seal it tightly and use a rolling pin or the flat side of a meat mallet to gently pound and roll over the biscuits until evenly crumbled. Avoid over-processing into fine dust, as some larger pieces add texture and prevent the base from becoming soggy too quickly. Set aside about one-third of the crumbs for sprinkling on top later, reserving the rest for the bottom layer. This step takes just 2 minutes and ensures even distribution in each glass.
Step 2: Mix the Creamy FillingIn a small mixing bowl, scoop out the 8 oz of low fat Vanilla Greek Yogurt. Add 1 Tbsp of Lemon Curd right into the center of the yogurt. Use a spoon or small spatula to gently fold the lemon curd into the yogurt, swirling it to create beautiful ribbons of bright yellow throughout the creamy white base. Do not overmix; aim for a marbled effect where pockets of tart lemon curd remain visible against the smooth yogurt.
This technique preserves the distinct flavors, allowing the tangy lemon to burst forth in each bite while the vanilla yogurt provides a cooling, velvety backdrop. Taste a small bit to ensure the balance is right; the yogurt’s subtle sweetness tempers the curd’s sharpness. If your yogurt seems too thick, a quick stir for 30 seconds will loosen it perfectly for layering. Cover loosely if not assembling immediately to keep it chilled.
Step 3: Layer the First CrumbsSelect two clear trifle glasses or small jars for an elegant presentation that showcases the layers. Divide half of the prepared biscuit crumbs evenly between the two glasses, using about 1.5 to 2 tablespoons per glass. Press the crumbs gently but firmly into the bottom using the back of a spoon or your fingers. This compaction creates a solid base that holds up the weight of the upper layers without shifting.
Tap the glasses lightly on the counter to settle the crumbs and remove any air pockets, ensuring stability. The digestive biscuits’ subtle sweetness and graham-like flavor pair ideally here, mimicking a traditional cheesecake crust but with far less effort and calories.
Step 4: Add the Yogurt LayerSpoon half of the yogurt-lemon mixture over the crumb base in each glass, distributing it equally for uniform height. Use the spoon to smooth the top gently, creating a flat surface for the next layer. The yogurt should fill about one-third to half of the glass, depending on your container size, leaving ample room for fruit and topping.
This creamy layer introduces the dessert’s core indulgence, with the low-fat Greek yogurt offering protein-rich creaminess that satisfies without guilt. As it sits briefly, it softens the crumbs underneath just enough for flavor melding, but the pressing from Step 3 prevents sogginess.
Step 5: Incorporate Fresh RaspberriesRinse 8 to 10 fresh raspberries under cool water and pat them dry with a paper towel to remove excess moisture. Arrange 4 to 5 raspberries per glass, pressing them lightly into the yogurt layer around the edges for visual appeal and scattering a few in the center.
Their vibrant red hue pops against the pale yogurt, signaling freshness and tartness. Do not chop the berries; keep them whole to release juices gradually as the trifle sets, infusing natural sweetness and a jammy texture. This fruit layer adds brightness, cutting through the richness and providing antioxidants for a healthier twist on dessert.
Step 6: Repeat the Crumb LayerSprinkle the remaining biscuit crumbs over the raspberries in each glass, using about 1 tablespoon per serving. This middle crumb layer acts as a buffer, separating the fruit’s moisture from the final yogurt addition and building textural complexity. Distribute evenly to cover the berries completely, then press down lightly once more. The repetition reinforces the crust-like element, ensuring every spoonful delivers crunch amid the softness.
Step 7: Finish with Yogurt ToppingAdd the remaining yogurt-lemon mixture on top of the second crumb layer, dividing it between the glasses. Smooth the surface with a spoon for a polished finish, and create gentle swirls if desired to highlight the marbling. This top layer seals in the flavors, providing a clean, creamy cap that invites digging in. Chill the assembled trifles in the refrigerator for at least 15 minutes, or up to 2 hours, to allow flavors to harmonize and the structure to firm up slightly.
Step 8: Garnish and ServeJust before serving, add the reserved biscuit crumbs on top of each trifle for a fresh crunch. Place 2 to 3 additional fresh raspberries upright in the center, and if available, a tiny dollop of extra lemon curd for shine. Serve chilled with long spoons to reach all layers easily. The trifles hold shape well, making them portable for picnics or parties.
- Prep Time: 10 Mins
- Cook Time: 0 Mins


