If you love warm, flaky, buttery pastries filled with a smooth, creamy, slightly tangy cheese filling, then this homemade Cheese Danish recipe is a must-try. Despite sounding fancy, it’s surprisingly easy to make with just a few simple ingredients and minimal effort. This guide will walk you through each step of the process so you can enjoy bakery-quality Cheese Danishes fresh from your own oven anytime.
Ingredients You’ll Need:
- 4 oz of cream cheese, at room temperature
- 3 tablespoons of sugar
- 1 egg yolk
- 1 tablespoon of sour cream
- ½ teaspoon of vanilla extract
- 1 teaspoon of lemon zest
- 1 sheet of frozen puff pastry, thawed
- 1 egg, whisked with a splash of water for egg wash
Step 1: Prepare the Cheese Filling
Begin by making the rich and creamy cheese filling which is the heart of the danish. In a mixing bowl, combine the room-temperature cream cheese and sugar. Using a whisk or electric mixer, beat the mixture until smooth and creamy without lumps.
Next, add the egg yolk which acts as a binder to hold the filling together as it bakes. Mix it in fully but avoid overwhipping to keep the texture pleasant. Then, mix in the sour cream which adds moisture and a slight tang to lighten the richness.
For zest and aroma, add the vanilla extract and freshly grated lemon zest. The lemon zest is key here as it cuts through the richness of the cheese, balancing the flavor beautifully. Whisk all ingredients until fully combined and creamy. Set the filling aside while you prepare the pastry.
Step 2: Prepare the Puff Pastry Base
Lightly dust your working surface with flour to prevent sticking. Unfold the thawed sheet of frozen puff pastry carefully. Using a rolling pin, gently roll the pastry out into a roughly 10-inch by 10-inch square. This will help to even out the thickness and ensure a good puff when it bakes.
Once rolled out, cut the pastry into four equal-sized squares. Each square will become one Cheese Danish, so try to make them as even as possible for uniform baking.
Step 3: Fill the Pastry Squares
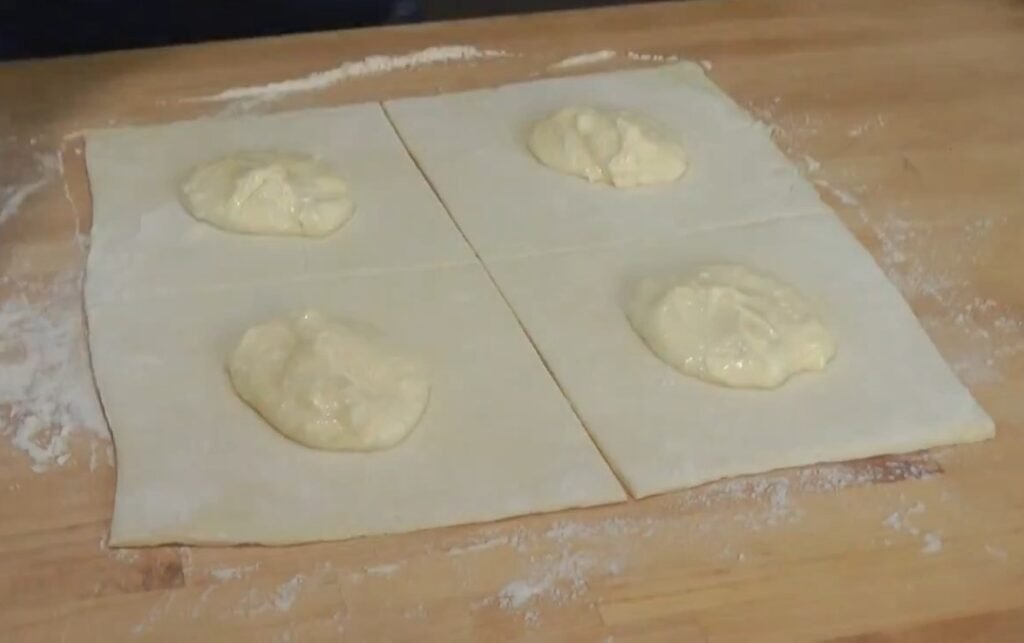
Evenly divide the prepared cream cheese filling into four portions. Place about one tablespoon of the filling in the center of each pastry square. Avoid overfilling as the mixture will spread during baking and you want to keep the pastry crisp rather than soggy.
Use your finger or a brush to lightly moisten the edges of each square with the egg wash you whisked earlier (egg beaten with water). This helps seal the dough when you fold it.
Step 4: Fold and Shape the Danishes
Now it’s time to shape the Danish pastries. Take two opposite corners of each square and pinch them together firmly over the filling to create a distinctive Danish shape. You should see a small pocket with the filling slightly exposed in the center. Make sure the edges are well sealed to prevent the filling from leaking as the pastries bake.
Place the shaped danishes onto a parchment-lined baking sheet. Brush the entire top surface generously with the egg wash to achieve that beautiful glossy golden finish when baked.
Step 5: Chill Before Baking
For the puff pastry to rise well and become flaky, it’s important to chill the shaped danishes before baking. Put the baking sheet with danishes into the refrigerator for 30 minutes. This step firms up the butter in the pastry and the filling which results in a better puff and prevents the filling from spilling.
Step 6: Bake to Golden Perfection
Preheat your oven to 400°F (200°C). Once chilled, remove the pastries from the refrigerator and place them in the hot oven on the middle rack. Bake for about 20 to 25 minutes or until the danishes are puffed up and golden brown on top and around the edges.
The filling will be set but still creamy inside, and the pastry will be flaky and light. Keep an eye on them in the last few minutes to avoid over browning.
Step 7: Cooling and Serving
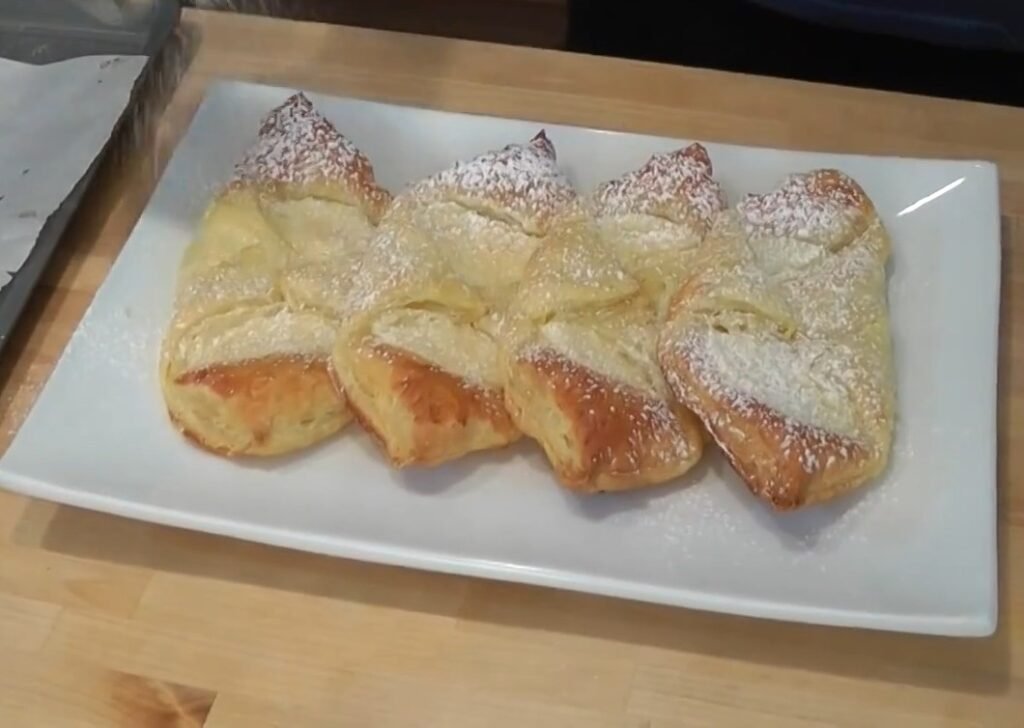
When baked, take the danishes out and let them cool for about 5 minutes on the baking sheet. They will still be warm and delicate, perfect for enjoying fresh. You can sprinkle some powdered sugar on top for an elegant finishing touch and sweetness contrast.
Serve them warm for breakfast, brunch, or as a delightful dessert with coffee or tea. These pastries are best eaten the day they are made but can be reheated gently in an oven to refresh.
Tips for Success
- Always use room temperature cream cheese and eggs so the filling combines smoothly without lumps.
- Don’t overfill the pastries to prevent sogginess.
- The lemon zest is crucial for cutting through the cream cheese richness; don’t skip it.
- Chilling the shaped danishes before baking helps the pastry puff nicely.
- Brush the pastries generously with egg wash for a shiny golden crust.
- Use parchment paper on your baking tray for easy transfer and cleanup.
Flavor Variations to Try
- Add fresh berries or fruit preserves on top of the cheese filling before folding.
- Swap lemon zest for orange zest or add a pinch of cinnamon for different aromas.
- Drizzle with a simple glaze made from powdered sugar mixed with lemon juice once cooled.
Essential Equipment Guide
- Mixing bowl
- Whisk
- Rolling pin
- Flour-dusted counter surface
- Knife or pastry cutter
- Pastry brush
- Parchment-lined baking sheet
Nutritional Information
Approximate values per serving (1/4 of recipe, based on standard ingredient data for cream cheese filling and puff pastry).
| Nutrient | Amount per Serving |
|---|---|
| Calories | 350-400 kcal |
| Total Fat | 25g |
| Saturated Fat | 12g |
| Carbohydrates | 28g |
| Sugars | 10g |
| Protein | 6g |
Pairings
- Fresh berries or fruit compote to balance richness
- Hot coffee or tea for breakfast
- Iced latte for a refreshing contrast
- Whipped cream for extra indulgence
Variations
- Add raspberry jam in the center before folding
- Use almond extract instead of vanilla
- Incorporate apple butter with the filling
- Top with powdered sugar glaze post-baking
Recipe Timing
- Prep Time: 20 minutes (including 30-minute chill)
- Cook Time: 20-25 minutes at 400°F
- Servings: 4 danish pastries
This Cheese Danish recipe is a perfect treat that combines the ease of ready puff pastry with a luscious homemade filling that will impress family and friends. With simple ingredients and straightforward steps, you can recreate a classic bakery good that’s fresh, warm, and irresistibly flaky. Enjoy baking!
Print
How to Make Perfect Homemade Cheese Danish: Step-by-Step Recipe
If you love warm, flaky, buttery pastries filled with a smooth, creamy, slightly tangy cheese filling, then this homemade Cheese Danish recipe is a must-try. Despite sounding fancy, it’s surprisingly easy to make with just a few simple ingredients and minimal effort. This guide will walk you through each step of the process so you can enjoy bakery-quality Cheese Danishes fresh from your own oven anytime.
- Total Time: 45 Mins
Ingredients
- 4 oz of cream cheese, at room temperature
- 3 tablespoons of sugar
- 1 egg yolk
- 1 tablespoon of sour cream
- ½ teaspoon of vanilla extract
- 1 teaspoon of lemon zest
- 1 sheet of frozen puff pastry, thawed
- 1 egg, whisked with a splash of water for egg wash
Instructions
Begin by making the rich and creamy cheese filling which is the heart of the danish. In a mixing bowl, combine the room-temperature cream cheese and sugar. Using a whisk or electric mixer, beat the mixture until smooth and creamy without lumps.
Next, add the egg yolk which acts as a binder to hold the filling together as it bakes. Mix it in fully but avoid overwhipping to keep the texture pleasant. Then, mix in the sour cream which adds moisture and a slight tang to lighten the richness.
For zest and aroma, add the vanilla extract and freshly grated lemon zest. The lemon zest is key here as it cuts through the richness of the cheese, balancing the flavor beautifully. Whisk all ingredients until fully combined and creamy. Set the filling aside while you prepare the pastry.
Step 2: Prepare the Puff Pastry Base
Lightly dust your working surface with flour to prevent sticking. Unfold the thawed sheet of frozen puff pastry carefully. Using a rolling pin, gently roll the pastry out into a roughly 10-inch by 10-inch square. This will help to even out the thickness and ensure a good puff when it bakes.
Once rolled out, cut the pastry into four equal-sized squares. Each square will become one Cheese Danish, so try to make them as even as possible for uniform baking.
Step 3: Fill the Pastry Squares
Evenly divide the prepared cream cheese filling into four portions. Place about one tablespoon of the filling in the center of each pastry square. Avoid overfilling as the mixture will spread during baking and you want to keep the pastry crisp rather than soggy.
Use your finger or a brush to lightly moisten the edges of each square with the egg wash you whisked earlier (egg beaten with water). This helps seal the dough when you fold it.
Step 4: Fold and Shape the Danishes
Now it’s time to shape the Danish pastries. Take two opposite corners of each square and pinch them together firmly over the filling to create a distinctive Danish shape. You should see a small pocket with the filling slightly exposed in the center. Make sure the edges are well sealed to prevent the filling from leaking as the pastries bake.
Place the shaped danishes onto a parchment-lined baking sheet. Brush the entire top surface generously with the egg wash to achieve that beautiful glossy golden finish when baked.
Step 5: Chill Before Baking
For the puff pastry to rise well and become flaky, it’s important to chill the shaped danishes before baking. Put the baking sheet with danishes into the refrigerator for 30 minutes. This step firms up the butter in the pastry and the filling which results in a better puff and prevents the filling from spilling.
Step 6: Bake to Golden Perfection
Preheat your oven to 400°F (200°C). Once chilled, remove the pastries from the refrigerator and place them in the hot oven on the middle rack. Bake for about 20 to 25 minutes or until the danishes are puffed up and golden brown on top and around the edges.
The filling will be set but still creamy inside, and the pastry will be flaky and light. Keep an eye on them in the last few minutes to avoid over browning.
Step 7: Cooling and Serving
When baked, take the danishes out and let them cool for about 5 minutes on the baking sheet. They will still be warm and delicate, perfect for enjoying fresh. You can sprinkle some powdered sugar on top for an elegant finishing touch and sweetness contrast.
Serve them warm for breakfast, brunch, or as a delightful dessert with coffee or tea. These pastries are best eaten the day they are made but can be reheated gently in an oven to refresh.
- Prep Time: 20 Mins
- Cook Time: 25 Mins