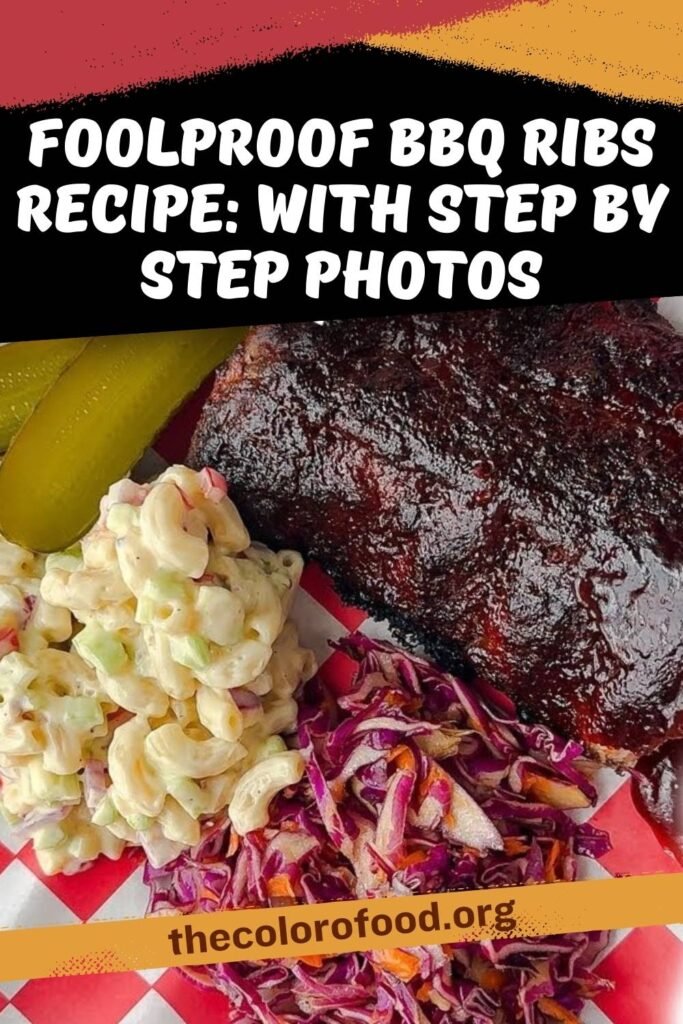
This recipe delivers fall-off-the-bone baby back ribs using a simple oven-to-grill method that ensures tenderness and bold flavor every time. Per rack, it starts with removing the membrane, applying mustard as a binder, seasoning generously, slow-cooking in the oven, then finishing on the grill with a smoker packet and BBQ sauce for caramelized perfection.
Ingredients
Per rack of baby back ribs:
- 4 Tbsp yellow mustard
- 1/4 cup dry BBQ seasoning blend (use your favorite, like Kingsford Bold and Smoky)
- 2/3 cup of your favorite BBQ sauce
Note: Always remove the membrane from the bone side first to avoid chewy bits.
Essential Equipment Guide
- Sharp knife (for membrane removal)
- Paper towels (for grip during membrane removal)
- Pastry brush (for applying mustard and sauce)
- Aluminum foil (for covering ribs and making smoker packet)
- Baking sheet or pan (for oven cooking)
- Gas grill (for finishing with smoke)
- Wood chips (unsoaked, for smoker packet)
- Tongs (for handling ribs)
Recipe Prep Details
- Prep Time: 20 minutes
- Cook Time: 2.5 hours (2 hours oven + 30 minutes grill)
- Servings: 4-6 per rack
Step 1: Prepare the Ribs
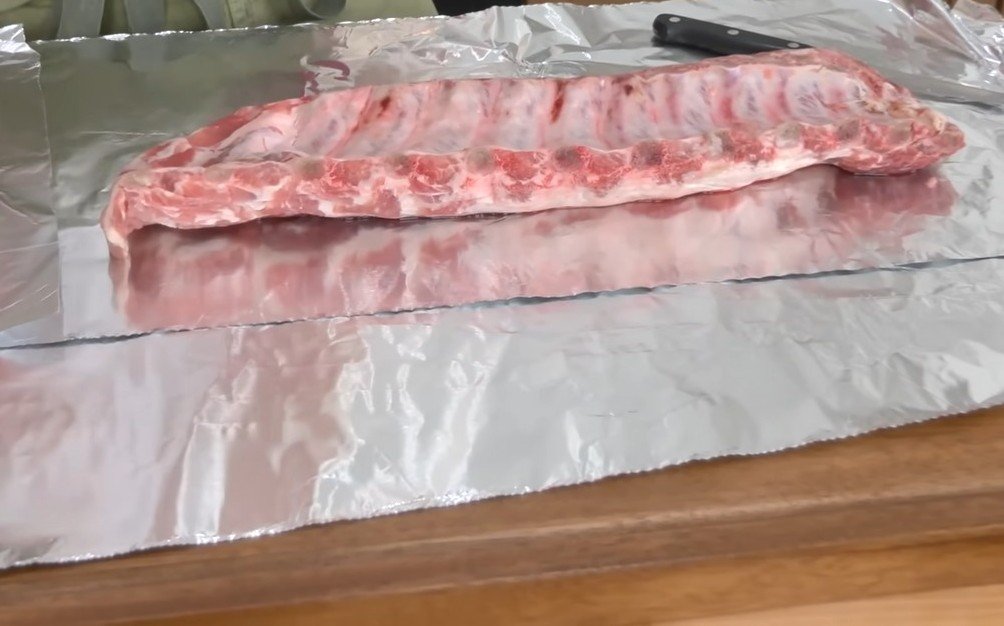
Begin with one rack of baby back ribs laid bone-side up on a clean surface. Locate the thin, silvery membrane covering the bones on the underside, which can make the ribs chewy if left on. Use a sharp knife to loosen one corner of the membrane by sliding the tip under it near the end of the rack, where it meets the first bone.
Grab the loosened edge with a paper towel for better grip, as it prevents slipping, and pull firmly to remove the membrane in one piece if possible. If it tears, repeat the process on remaining sections until fully removed. Trim any excess fat pockets along the edges for cleaner presentation and even cooking. Pat the ribs dry with additional paper towels to ensure seasonings adhere well later. This crucial prep step, often overlooked by beginners, guarantees tender, seamless bites without stringy texture.
Step 2: Preheat Oven and Apply Mustard Binder
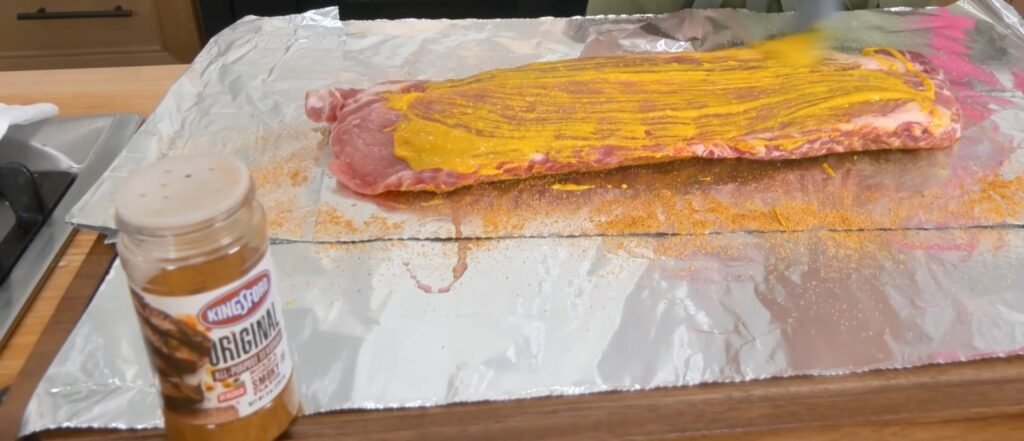
Preheat your oven to 325 degrees Fahrenheit for the low-and-slow cooking phase that tenderizes the meat. Lay the prepared rack meat-side up on a large sheet of heavy-duty aluminum foil, enough to fully enclose it like a packet. Spread 2 tablespoons of yellow mustard evenly over the meaty top side using a pastry brush; the tangy mustard acts as a neutral binder without overpowering flavors.
Flip the rack and apply another 2 tablespoons to the bone side, ensuring complete coverage on all surfaces. The mustard creates a sticky base that helps the dry rub cling during cooking and adds subtle tanginess that enhances the final BBQ profile. If needed, add a touch more mustard for thorough coating.
Step 3: Season Generously
Sprinkle about 2 tablespoons of your preferred dry BBQ seasoning blend over the mustard-coated top side, rubbing it in lightly for even distribution. Be generous if your rub is balanced and not overly salty; popular options like Kingsford Bold and Smoky provide smoky, bold notes that pair perfectly.
Flip and repeat on the bone side, using another 2 tablespoons to fully cover. Excess seasoning that falls off will still adhere as moisture releases during cooking. Personalize here: families often use heirloom rubs, while store-bought works reliably for consistent results. Fold the foil tightly around the ribs to seal in steam, creating a packet that promotes even tenderizing.
Step 4: Oven Cook for Tenderness
Place the foil packet on a baking sheet and into the preheated 325-degree oven. Bake for 2 hours undisturbed; this gentle heat breaks down connective tissues for fall-apart texture without drying out the meat. Alternatively, use a grill set to 300-325 degrees with indirect heat, rotating occasionally, but oven simplicity avoids constant monitoring.
After 2 hours, check doneness by gently twisting a bone-end rib; it should move freely, and meat should pull back slightly from bones. Remove from oven and let rest 10-15 minutes while preheating the grill; resting redistributes juices for maximum succulence.
Step 5: Make the Smoker Packet

While ribs rest, create a DIY smoker packet for authentic smoky flavor on a gas grill. Layer 3-4 sheets of heavy-duty aluminum foil into a sturdy base. Pile 1/2 cup unsoaked wood chips (hickory or applewood recommended) in the center.
Gather foil edges to form a tight pouch, then poke numerous holes in the top with a sharp knife to allow smoke escape. This packet mimics commercial smoker boxes, infusing ribs with genuine barbecue essence in just 30 minutes.
Step 6: Preheat Grill and Sauce Ribs

Preheat grill to 375 degrees Fahrenheit on one side only for indirect cooking. Place smoker packet directly over the lit burner (opposite food side) to generate smoke. Unwrap rested ribs, brush 1/3 cup BBQ sauce generously over the top meat side only. Position sauced ribs on the cool, indirect side away from direct flame.
Step 7: Grill and Finish
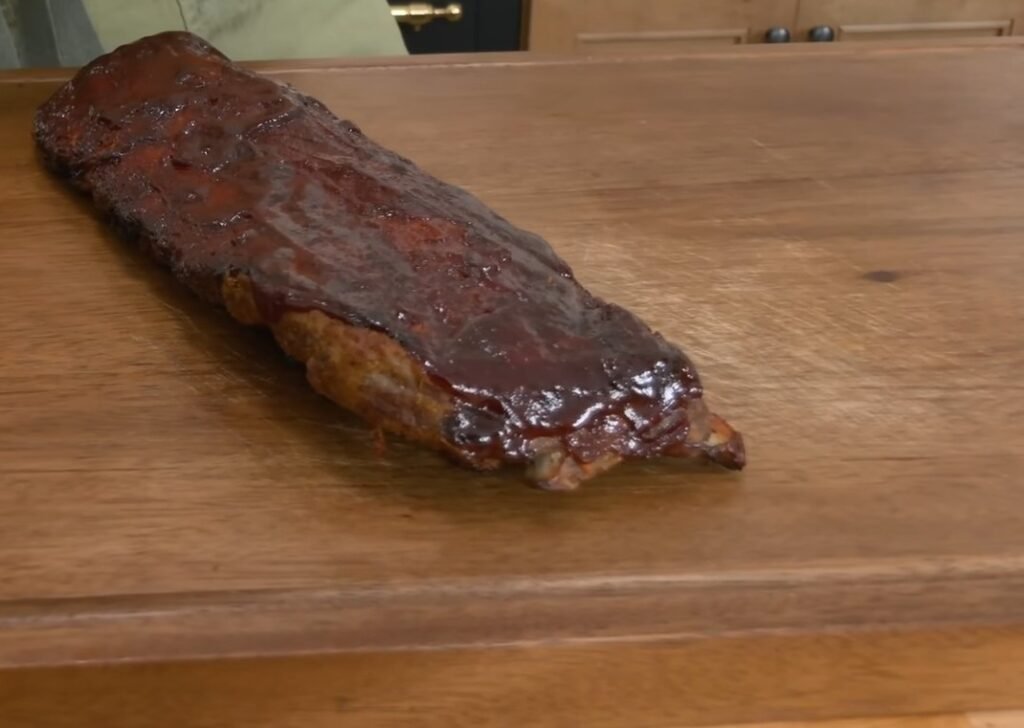
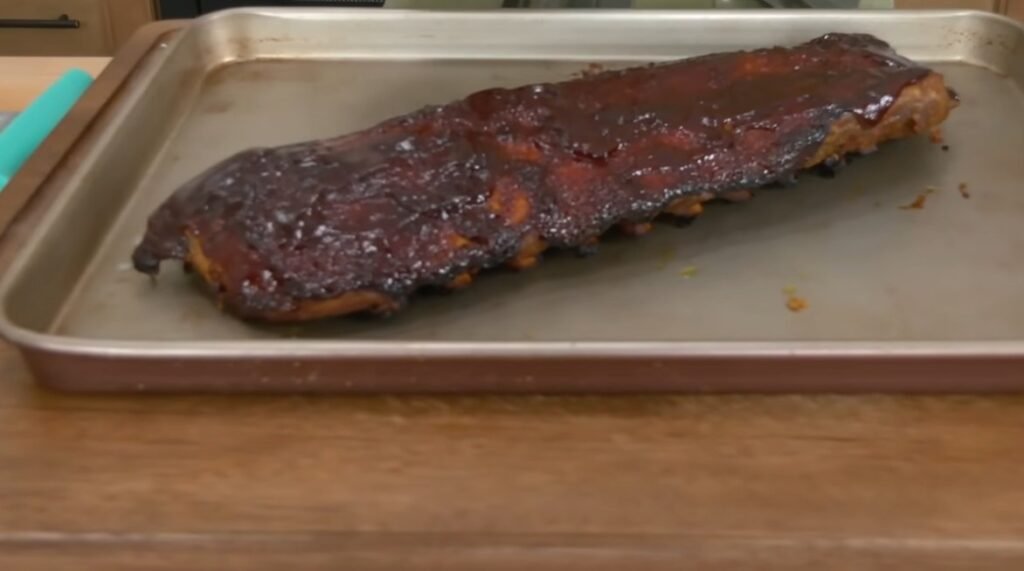
Close grill lid and cook 30 minutes total; sauce caramelizes while smoke permeates. At 15 minutes, apply another 1/3 cup BBQ sauce without flipping to preserve bark integrity. Never turn ribs to avoid tearing tender meat. Packet smoke lasts perfectly for this duration; refill if needed for larger batches. Ribs are done when deeply caramelized, glossy, and meat pulls cleanly from bones. Transfer carefully with tongs to a board; rest 5 minutes before slicing between bones.
Nutritional Information
| Nutrient (per serving, 1/4 rack) | Amount | % Daily Value |
|---|---|---|
| Calories | 450 | 23% |
| Protein | 35g | 70% |
| Fat | 28g | 36% |
| Carbs | 15g | 5% |
| Sodium | 1200mg | 52% |
*Estimates based on standard baby back ribs with listed ingredients; varies by rub/sauce.
Pairings
- Classic coleslaw for creamy crunch balancing richness.
- Corn on the cob, grilled alongside for smoky sweetness.
- Baked beans with molasses for hearty, complementary sweetness.
- Ice-cold beer or iced tea to cut through the sauce.
Variations
- Spare ribs: Increase oven time to 2.5-3 hours for larger cut.
- No grill? Broil sauced ribs 3-5 minutes post-oven.
- Soaked chips: Use for milder smoke; unsoaked for intense.
- Spice rub: Add cayenne for heat in seasoning step.
Comprehensive Tips
- Membrane Removal Mastery: Practice on cheaper cuts first; the paper towel trick is key as it amplifies grip by absorbing moisture, allowing a clean pull every time without frustration. Skipping this leads to tough, unpleasant chews that ruin the eating experience, so invest these 2 minutes upfront for pro-level results.
- Mustard Binder Benefits: Yellow mustard is ideal because its vinegar tang tenderizes slightly while vinegar evaporates, leaving no taste behind; alternatives like oil work but lack acidity punch. Brush thinly to avoid pooling, ensuring rub penetrates evenly for layered flavor.
- Rub Selection Strategy: Test your rub’s salt content on a small meat patch; overseasoning amplifies during moisture release, turning balanced into briney. Generous application builds bark, but pat off excess pre-wrap to prevent waste.
- Oven Packet Perfection: Double-layer foil prevents leaks, trapping steam for braise-like tenderness; poke no holes until smoker step. Low 325 temp mimics smoker without fuel fuss, ideal for apartments or bad weather.
- Wood Chip Choices: Hickory for bold bacon notes, apple for subtle fruitiness matching pork; avoid mesquite as it bitters quickly in packets. Unsoaked chips ignite faster for reliable 30-minute smoke bursts.
- Grill Heat Zoning: Opposite-side placement prevents sauce burning while smoke swirls evenly; lid down circulates flavor like a true smoker. Monitor packet every 15 minutes visually through lid window if available.
- Sauce Timing Secrets: First coat pre-grill sets base, mid-grill refresh builds glaze without sogginess; thick sauces cling best, homemade lets sugar control caramel speed. No flipping preserves char crust.
- Doneness Detection: Bend test overpowers tooth-pull; probe bone ends for zero resistance. Overcook risks mush, under risks toughness, so timer plus visual guides nail it.
- Scaling for Crowds: Method scales linearly, one rack per foil; oven multiple sheets rotate midway. Grill in batches to avoid overcrowding, maintaining indirect zones.
- Storage and Reheat: Fridge up to 4 days wrapped tight; reheat foil-covered at 300 degrees 20 minutes, then sauce and broil. Freezes 3 months, thaw overnight before reviving.
- Common Fixes: Pale color? More grill time. Dry? Extend oven by 15 minutes. Bland? Layer rubs pre and post-sauce.

Foolproof BBQ Ribs Recipe: With Step By Step Photos
This recipe delivers fall-off-the-bone baby back ribs using a simple oven-to-grill method that ensures tenderness and bold flavor every time. Per rack, it starts with removing the membrane, applying mustard as a binder, seasoning generously, slow-cooking in the oven, then finishing on the grill with a smoker packet and BBQ sauce for caramelized perfection.
- Total Time: 2 Hr 50 Mins
Ingredients
Per rack of baby back ribs:
- 4 Tbsp yellow mustard
- 1/4 cup dry BBQ seasoning blend (use your favorite, like Kingsford Bold and Smoky)
- 2/3 cup of your favorite BBQ sauce
Note: Always remove the membrane from the bone side first to avoid chewy bits.
Instructions
Begin with one rack of baby back ribs laid bone-side up on a clean surface. Locate the thin, silvery membrane covering the bones on the underside, which can make the ribs chewy if left on. Use a sharp knife to loosen one corner of the membrane by sliding the tip under it near the end of the rack, where it meets the first bone.
Grab the loosened edge with a paper towel for better grip, as it prevents slipping, and pull firmly to remove the membrane in one piece if possible. If it tears, repeat the process on remaining sections until fully removed. Trim any excess fat pockets along the edges for cleaner presentation and even cooking. Pat the ribs dry with additional paper towels to ensure seasonings adhere well later. This crucial prep step, often overlooked by beginners, guarantees tender, seamless bites without stringy texture.
Step 2: Preheat Oven and Apply Mustard BinderPreheat your oven to 325 degrees Fahrenheit for the low-and-slow cooking phase that tenderizes the meat. Lay the prepared rack meat-side up on a large sheet of heavy-duty aluminum foil, enough to fully enclose it like a packet. Spread 2 tablespoons of yellow mustard evenly over the meaty top side using a pastry brush; the tangy mustard acts as a neutral binder without overpowering flavors.
Flip the rack and apply another 2 tablespoons to the bone side, ensuring complete coverage on all surfaces. The mustard creates a sticky base that helps the dry rub cling during cooking and adds subtle tanginess that enhances the final BBQ profile. If needed, add a touch more mustard for thorough coating.
Step 3: Season GenerouslySprinkle about 2 tablespoons of your preferred dry BBQ seasoning blend over the mustard-coated top side, rubbing it in lightly for even distribution. Be generous if your rub is balanced and not overly salty; popular options like Kingsford Bold and Smoky provide smoky, bold notes that pair perfectly.
Flip and repeat on the bone side, using another 2 tablespoons to fully cover. Excess seasoning that falls off will still adhere as moisture releases during cooking. Personalize here: families often use heirloom rubs, while store-bought works reliably for consistent results. Fold the foil tightly around the ribs to seal in steam, creating a packet that promotes even tenderizing.
Step 4: Oven Cook for TendernessPlace the foil packet on a baking sheet and into the preheated 325-degree oven. Bake for 2 hours undisturbed; this gentle heat breaks down connective tissues for fall-apart texture without drying out the meat. Alternatively, use a grill set to 300-325 degrees with indirect heat, rotating occasionally, but oven simplicity avoids constant monitoring.
After 2 hours, check doneness by gently twisting a bone-end rib; it should move freely, and meat should pull back slightly from bones. Remove from oven and let rest 10-15 minutes while preheating the grill; resting redistributes juices for maximum succulence.
Step 5: Make the Smoker PacketWhile ribs rest, create a DIY smoker packet for authentic smoky flavor on a gas grill. Layer 3-4 sheets of heavy-duty aluminum foil into a sturdy base. Pile 1/2 cup unsoaked wood chips (hickory or applewood recommended) in the center.
Gather foil edges to form a tight pouch, then poke numerous holes in the top with a sharp knife to allow smoke escape. This packet mimics commercial smoker boxes, infusing ribs with genuine barbecue essence in just 30 minutes.
Step 6: Preheat Grill and Sauce RibsPreheat grill to 375 degrees Fahrenheit on one side only for indirect cooking. Place smoker packet directly over the lit burner (opposite food side) to generate smoke. Unwrap rested ribs, brush 1/3 cup BBQ sauce generously over the top meat side only. Position sauced ribs on the cool, indirect side away from direct flame.
Step 7: Grill and FinishClose grill lid and cook 30 minutes total; sauce caramelizes while smoke permeates. At 15 minutes, apply another 1/3 cup BBQ sauce without flipping to preserve bark integrity. Never turn ribs to avoid tearing tender meat. Packet smoke lasts perfectly for this duration; refill if needed for larger batches. Ribs are done when deeply caramelized, glossy, and meat pulls cleanly from bones. Transfer carefully with tongs to a board; rest 5 minutes before slicing between bones.
- Prep Time: 20 Mins
- Cook Time: 2.5 Hrs