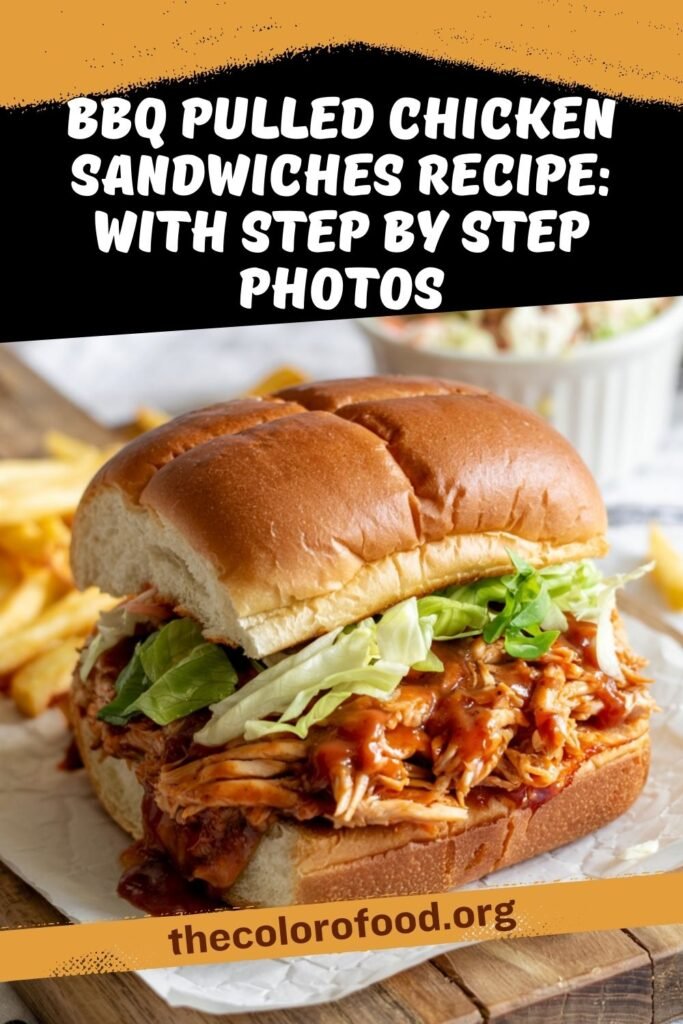
BBQ Pulled Chicken Sandwiches offer a quick, flavorful alternative to slow-cooked pulled pork, perfect for weeknight dinners.
Ingredients
- 2 Pounds of Boneless Skinless Chicken Thighs
- 1 Onion, finely sliced
- 1 tsp of Paprika
- 1 tsp of Garlic powder
- 1 tsp of Onion Powder
- 1 Tsp of Chili Powder
- 2 Tbsp of Vegetable Oil
- 1/2 cup of Chicken Stock
- 1 1/2 Cups of BBQ Sauce or to taste
- Salt and Pepper, to taste
- 6 Toasted Buns
Step 1: Prepare Your Workspace and Preheat Oil
Start by gathering all your ingredients and equipment to ensure a smooth cooking process. Take a moment to pat the chicken thighs dry with paper towels; this helps the spices adhere better and promotes even browning later on. In a large skillet with high sides, pour in the 2 tablespoons of vegetable oil and set it over medium-high heat.
Allow the oil to preheat fully, which takes about 1 to 2 minutes; you will know it is ready when it shimmers slightly and a small piece of onion sizzles upon contact. Preheating properly prevents the chicken from sticking and ensures that beautiful golden crust forms, mimicking the essence of traditional barbecue without hours of waiting.
Step 2: Season the Chicken Thoroughly
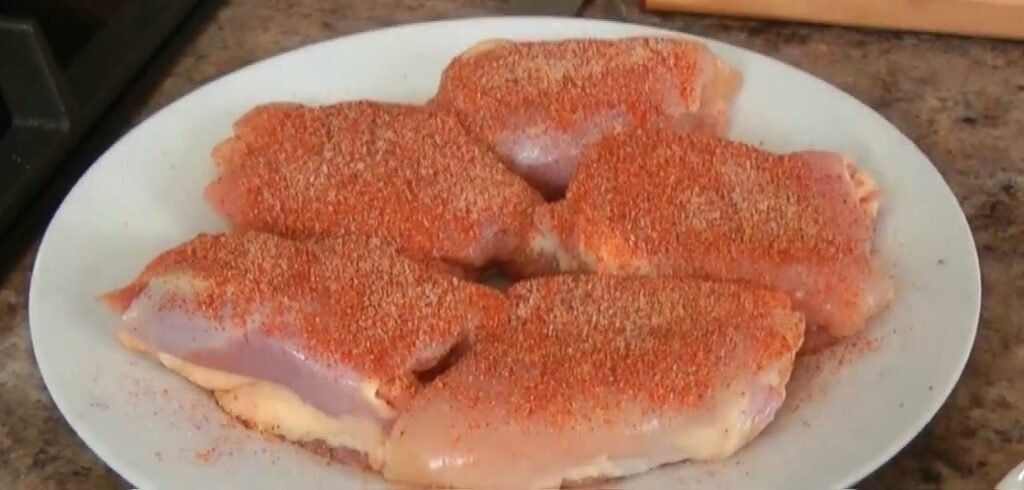
While the oil heats, mix your dry spices in a small bowl to create a flavorful rub inspired by classic barbecue profiles. Combine 1 teaspoon paprika, 1 teaspoon garlic powder, 1 teaspoon onion powder, and 1 teaspoon chili powder, then season generously with salt and pepper to taste. Sprinkle half of this mixture evenly over one side of the chicken thighs.
Leaving a bit of fat on the thighs adds succulence, so trim minimally if at all. This seasoning step infuses the meat with smoky, savory notes right from the start, building layers of flavor that carry through the entire dish. Distribute the spices uniformly to avoid any bland spots, and reserve the remaining half for the second side.
Step 3: Sear the Chicken for Flavor Development
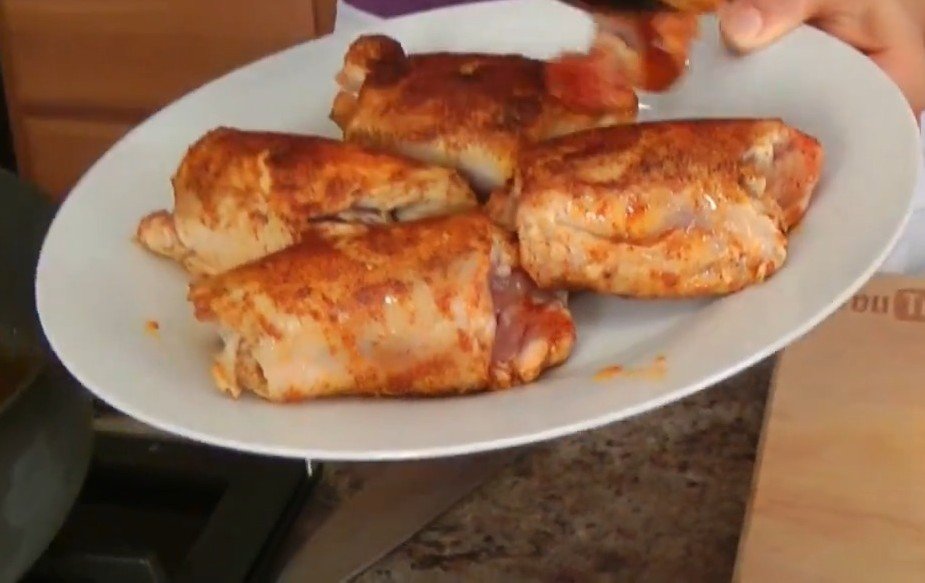
Place the seasoned side of the chicken thighs down into the hot oil, working in batches if needed to avoid overcrowding the skillet, which could lead to steaming instead of searing. Cook for 3 to 4 minutes until a nice golden brown color develops on the bottom. Immediately sprinkle the remaining spice mixture, along with more salt and pepper, over the top side.
Flip the chicken and sear the other side for another 3 to 4 minutes. This high-heat sear creates a flavorful crust through the Maillard reaction, locking in juices and amplifying the barbecue essence. Remove the chicken to a plate once both sides are beautifully browned, leaving all the spiced oil and flavorful bits in the pan; these are gold for the next steps.
Step 4: Sauté the Onions to Build Depth

With the skillet still hot, add the finely sliced onion directly into the pan drippings from the chicken. Stir occasionally and cook for 4 to 5 minutes until the onions soften, become translucent, and pick up a bit of color. This process caramelizes the onions slightly, releasing their natural sweetness that balances the spices and future barbecue sauce.
The residual spices in the oil coat the onions, infusing them with paprika, chili, and garlic notes. If the pan seems too dry, add a splash of water, but usually, the chicken fat and oil suffice. Soft onions melt into the final pulled chicken, providing texture without overpowering the dish.
Step 5: Simmer Chicken in Stock for Tenderness
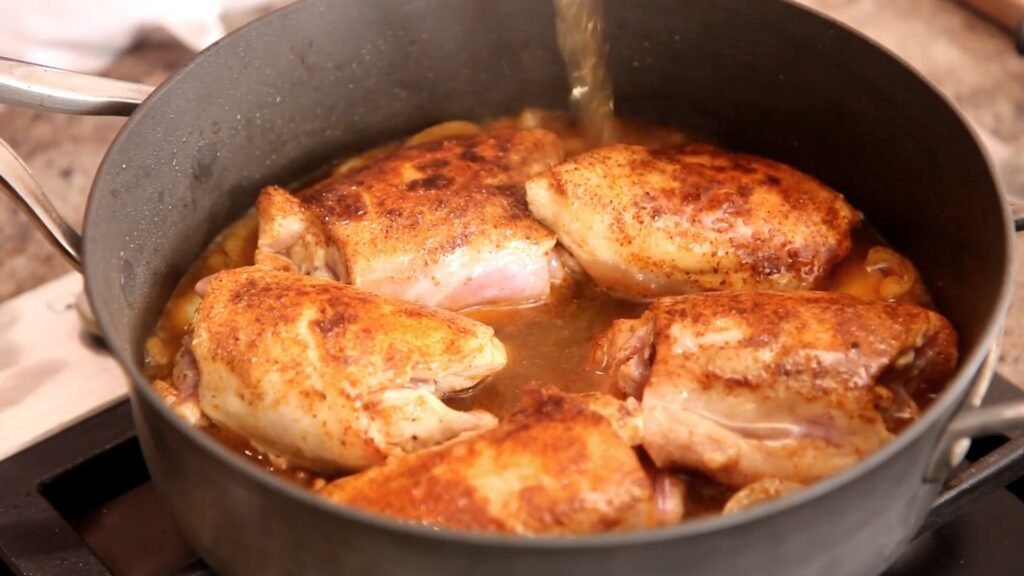
Lower the heat to medium-low, then pour in the 1/2 cup of chicken stock, scraping up any browned bits from the pan bottom with a wooden spoon; these bits are packed with umami. Return the seared chicken thighs to the skillet, nestling them into the onions and stock.
Cover with a lid and let simmer gently for about 20 minutes, or until the chicken is fully cooked through and reaches an internal temperature of 165 degrees Fahrenheit if checked with a thermometer. The low simmer breaks down the chicken fibers tenderly without drying it out, similar to slow cooking but in a fraction of the time. Avoid frequent lifting of the lid to maintain steam and consistent cooking.
Step 6: Shred the Chicken Easily
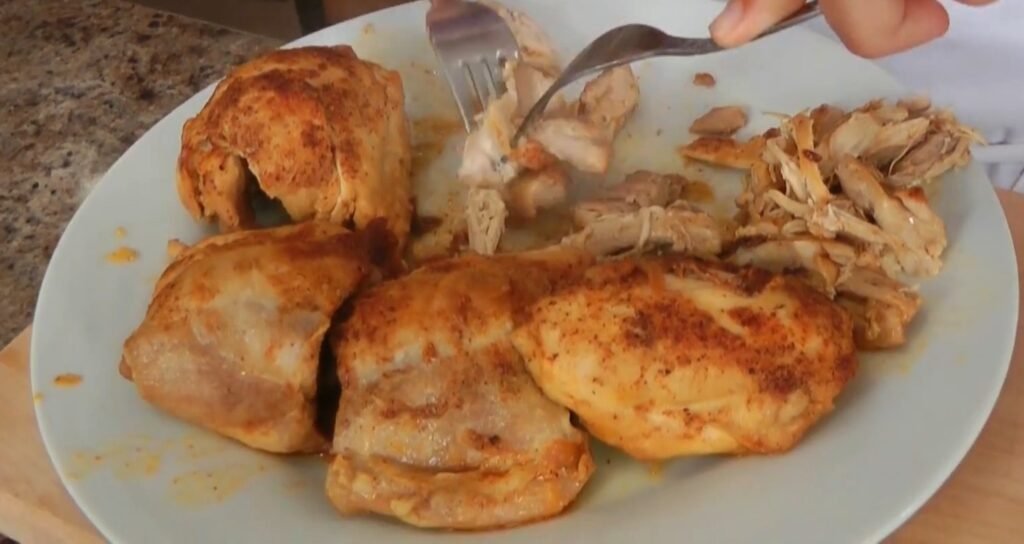
Transfer the cooked chicken to a clean plate and allow it to cool for just a few minutes until handleable. Using two forks, pull the chicken apart into shreds; you can shred as coarsely or finely as preferred, or even chop with a knife for chunkier pieces. I demonstrate this simple two-fork method, which takes under 2 minutes for 2 pounds. The chicken should shred effortlessly due to the simmering, yielding moist strands perfect for saucing. Discard any tough bits if present, but thighs are forgiving and mostly uniform.
Step 7: Combine with BBQ Sauce and Simmer Again
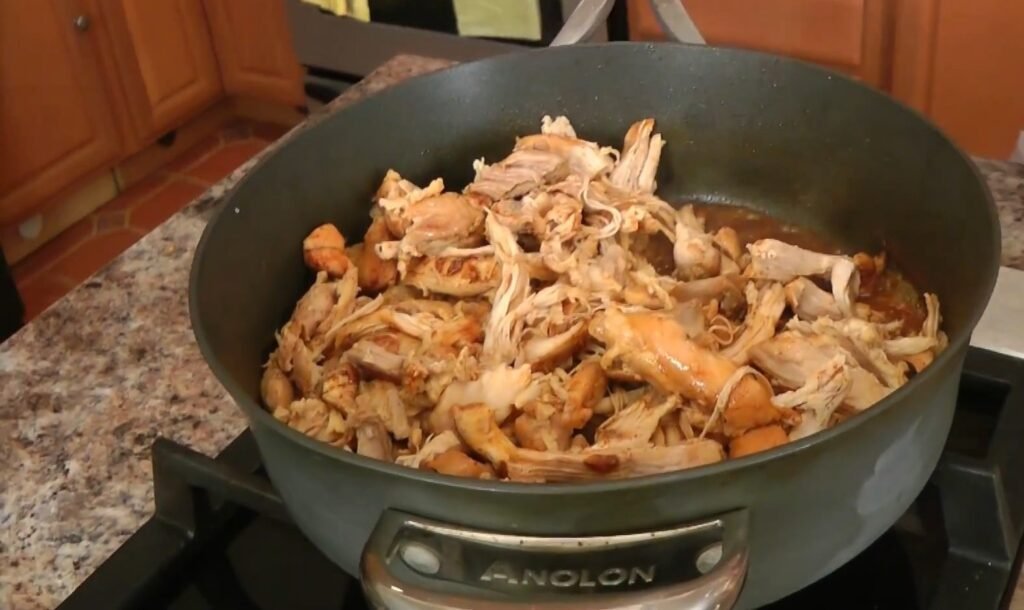
Return the shredded chicken to the skillet with the onions and leftover cooking juices, which are now richly flavored. Stir in 1 1/2 cups of your favorite BBQ sauce, starting with less and adding more to taste for desired sauciness; I prefer homemade version but store-bought works fine.
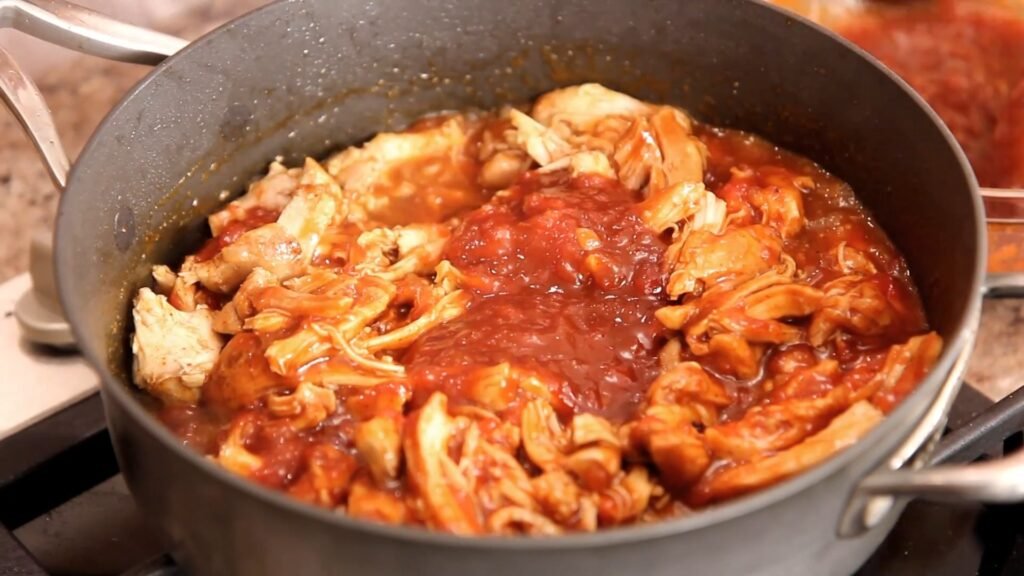
Lower the heat to medium-low, cover, and simmer for 5 to 10 minutes, stirring occasionally. This allows the chicken to absorb the tangy, sweet sauce fully, thickening it slightly into a glossy coating. Taste and adjust salt, pepper, or sauce as needed during this stage.
Step 8: Toast the Buns for Texture
While the chicken simmers, split the 6 buns and place them cut-side up under a broiler or in a toaster oven for 1 to 2 minutes until golden and crisp. Toasting prevents sogginess from the sauce and adds a delightful crunch that contrasts the tender pulled chicken. No butter is necessary, as the BBQ sauce provides ample richness.
Step 9: Assemble and Serve Hot
Pile generous portions of the saucy pulled chicken onto the bottom toasted buns. Top with coleslaw for crunch and tang, or pickles if preferred. Cap with the top bun and serve immediately. Expect messy, delicious bites that capture barbecue joy swiftly.
Essential Equipment Guide
- Large skillet with high sides
- Lid for skillet
- Small bowl for spices
- Tongs or spatula
- Two forks for shredding
- Broiler or toaster oven
- Wooden spoon
Prep, Cook Time, and Servings
Nutritional Information
| Nutrient (per serving, approx. for 6 servings) | Amount |
|---|---|
| Calories | 550 |
| Protein | 35g |
| Carbohydrates | 45g |
| Fat | 25g |
| Sodium | 1200mg |
Estimates based on standard ingredient values; varies by BBQ sauce.
Pairings
- Classic coleslaw for crunch and creaminess.
- Dill pickles to cut richness.
- Potato chips or fries for casual sides.
- Iced tea or cola to complement sweetness.
Variations
- Use chicken breasts for leaner option, but thighs are juicier.
- Add smoked paprika for deeper smoke flavor.
- Make sliders with smaller buns for parties.
Tips
- Pat chicken dry before seasoning for better sear.
- Taste sauce incrementally to avoid oversweetness.
- Simmer covered to retain moisture.
- Shred while warm for easiest texture.
- Toast buns last minute to keep crisp.
- Leftovers reheat well with a splash of stock.
- Choose thick BBQ sauce to prevent watery filling.

BBQ Pulled Chicken Sandwiches Recipe: With Step By Step Photos
BBQ Pulled Chicken Sandwiches offer a quick, flavorful alternative to slow-cooked pulled pork, perfect for weeknight dinners.
- Total Time: 40 Mins
Ingredients
- 2 Pounds of Boneless Skinless Chicken Thighs
- 1 Onion, finely sliced
- 1 tsp of Paprika
- 1 tsp of Garlic powder
- 1 tsp of Onion Powder
- 1 Tsp of Chili Powder
- 2 Tbsp of Vegetable Oil
- 1/2 cup of Chicken Stock
- 1 1/2 Cups of BBQ Sauce or to taste
- Salt and Pepper, to taste
- 6 Toasted Buns
Instructions
Start by gathering all your ingredients and equipment to ensure a smooth cooking process. Take a moment to pat the chicken thighs dry with paper towels; this helps the spices adhere better and promotes even browning later on. In a large skillet with high sides, pour in the 2 tablespoons of vegetable oil and set it over medium-high heat.
Allow the oil to preheat fully, which takes about 1 to 2 minutes; you will know it is ready when it shimmers slightly and a small piece of onion sizzles upon contact. Preheating properly prevents the chicken from sticking and ensures that beautiful golden crust forms, mimicking the essence of traditional barbecue without hours of waiting.
Step 2: Season the Chicken ThoroughlyWhile the oil heats, mix your dry spices in a small bowl to create a flavorful rub inspired by classic barbecue profiles. Combine 1 teaspoon paprika, 1 teaspoon garlic powder, 1 teaspoon onion powder, and 1 teaspoon chili powder, then season generously with salt and pepper to taste. Sprinkle half of this mixture evenly over one side of the chicken thighs.
Leaving a bit of fat on the thighs adds succulence, so trim minimally if at all. This seasoning step infuses the meat with smoky, savory notes right from the start, building layers of flavor that carry through the entire dish. Distribute the spices uniformly to avoid any bland spots, and reserve the remaining half for the second side.
Step 3: Sear the Chicken for Flavor DevelopmentPlace the seasoned side of the chicken thighs down into the hot oil, working in batches if needed to avoid overcrowding the skillet, which could lead to steaming instead of searing. Cook for 3 to 4 minutes until a nice golden brown color develops on the bottom. Immediately sprinkle the remaining spice mixture, along with more salt and pepper, over the top side.
Flip the chicken and sear the other side for another 3 to 4 minutes. This high-heat sear creates a flavorful crust through the Maillard reaction, locking in juices and amplifying the barbecue essence. Remove the chicken to a plate once both sides are beautifully browned, leaving all the spiced oil and flavorful bits in the pan; these are gold for the next steps.
Step 4: Sauté the Onions to Build DepthWith the skillet still hot, add the finely sliced onion directly into the pan drippings from the chicken. Stir occasionally and cook for 4 to 5 minutes until the onions soften, become translucent, and pick up a bit of color. This process caramelizes the onions slightly, releasing their natural sweetness that balances the spices and future barbecue sauce.
The residual spices in the oil coat the onions, infusing them with paprika, chili, and garlic notes. If the pan seems too dry, add a splash of water, but usually, the chicken fat and oil suffice. Soft onions melt into the final pulled chicken, providing texture without overpowering the dish.
Step 5: Simmer Chicken in Stock for TendernessLower the heat to medium-low, then pour in the 1/2 cup of chicken stock, scraping up any browned bits from the pan bottom with a wooden spoon; these bits are packed with umami. Return the seared chicken thighs to the skillet, nestling them into the onions and stock.
Cover with a lid and let simmer gently for about 20 minutes, or until the chicken is fully cooked through and reaches an internal temperature of 165 degrees Fahrenheit if checked with a thermometer. The low simmer breaks down the chicken fibers tenderly without drying it out, similar to slow cooking but in a fraction of the time. Avoid frequent lifting of the lid to maintain steam and consistent cooking.
Step 6: Shred the Chicken EasilyTransfer the cooked chicken to a clean plate and allow it to cool for just a few minutes until handleable. Using two forks, pull the chicken apart into shreds; you can shred as coarsely or finely as preferred, or even chop with a knife for chunkier pieces. I demonstrate this simple two-fork method, which takes under 2 minutes for 2 pounds. The chicken should shred effortlessly due to the simmering, yielding moist strands perfect for saucing. Discard any tough bits if present, but thighs are forgiving and mostly uniform.
Step 7: Combine with BBQ Sauce and Simmer AgainReturn the shredded chicken to the skillet with the onions and leftover cooking juices, which are now richly flavored. Stir in 1 1/2 cups of your favorite BBQ sauce, starting with less and adding more to taste for desired sauciness; I prefer homemade version but store-bought works fine.
Lower the heat to medium-low, cover, and simmer for 5 to 10 minutes, stirring occasionally. This allows the chicken to absorb the tangy, sweet sauce fully, thickening it slightly into a glossy coating. Taste and adjust salt, pepper, or sauce as needed during this stage.
Step 8: Toast the Buns for TextureWhile the chicken simmers, split the 6 buns and place them cut-side up under a broiler or in a toaster oven for 1 to 2 minutes until golden and crisp. Toasting prevents sogginess from the sauce and adds a delightful crunch that contrasts the tender pulled chicken. No butter is necessary, as the BBQ sauce provides ample richness.
Step 9: Assemble and Serve HotPile generous portions of the saucy pulled chicken onto the bottom toasted buns. Top with coleslaw for crunch and tang, or pickles if preferred. Cap with the top bun and serve immediately. Expect messy, delicious bites that capture barbecue joy swiftly.
- Prep Time: 15 Mins
- Cook Time: 25 Mins