
Discover the ultimate sausage and pepper sandwiches with this detailed recipe that transforms simple ingredients into a flavorful, saucy delight. These sandwiches feature tender Italian sausages simmered in a rich pepper-onion sauce, served on garlicky buttered rolls topped with melted provolone.
Ingredients
Main Ingredients:
- Olive oil
- 8 Italian sausages
- 1 large onion (or two medium onions), sliced
- 2 bell peppers, seeded and sliced
- 5 cloves of garlic, smashed and peeled (not chopped)
- A few long hots (optional, not chopped)
- 1/2 cup red wine
- 2 cups tomato sauce
- 1 1/2 cups beef stock
- 1 tsp granulated garlic
- 1 tsp Italian seasoning
- Fresh basil leaves
- Salt and pepper, to taste
For the Garlic Butter Rolls:
- Rolls (such as Kaiser or Portuguese rolls)
- 8 Tbsp butter, softened at room temperature
- 4 cloves garlic, grated
- Pinch of Italian seasoning
- 4 Tbsp freshly grated Parmigiano cheese
- Provolone cheese slices
Essential Equipment Guide
- Dutch oven or large heavy pot
- Skillet or saute pan
- Wooden spoon or spatula
- Knife for slicing
- Cutting board
- Grater for garlic
- Oven for toasting rolls
Recipe Timing and Yield
- Prep Time: 20 minutes
- Cook Time: 1 hour 15 minutes
- Servings: 4 to 6 sandwiches (adjust based on appetite; makes 8 sausages for leftovers)
Step 1: Prepare and Sear the Sausages

Start by heating a generous drizzle of olive oil in a large Dutch oven or heavy-bottomed pot over medium-high heat. Take your 8 Italian sausages and pierce each one a few times with a fork. This simple step prevents them from bursting during cooking and allows the flavors to meld beautifully with the sauce later.
Place the sausages in the hot oil and sear them on all sides until they develop a deep golden-brown crust, which usually takes about 8 to 10 minutes. Turn them occasionally with tongs to ensure even browning. The rendered fat from the sausages will add incredible richness to the dish, so do not wipe it away. Once seared to perfection, remove the sausages from the pot and set them aside on a plate. This initial sear locks in the juices and builds a flavorful foundation for the entire recipe. Keep the pot on the heat as you move to the vegetables, using the residual fat for the next step.
Step 2: Saute the Vegetables
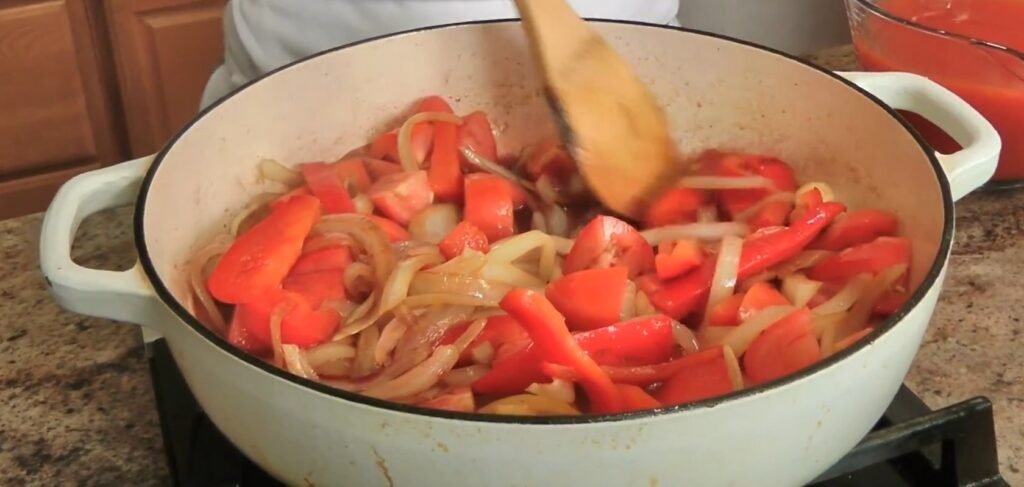
With the pot still hot and the sausage fat remaining, add your sliced onions and bell peppers. If using long hots for a spicy kick, toss them in whole now; they will infuse heat without overpowering the dish since they stay intact. Sprinkle in a pinch of salt to help draw out moisture from the vegetables, promoting better caramelization.
Stir everything together over medium heat for about 5 to 7 minutes until the onions soften and turn translucent, and the peppers begin to wilt and release their natural sweetness. The aroma at this stage is irresistible, filling your kitchen with the comforting scent of home-cooked Italian classics.
Next, add the 5 smashed garlic cloves whole. Smashing them releases their oils gently, and leaving them whole ensures a mild, sweet flavor as they simmer without becoming bitter. Continue sauteing for another 2 to 3 minutes, stirring frequently to prevent burning. This vegetable base is the heart of the sauce, providing texture, color, and depth that elevates the sausages.
Step 3: Build the Sauce Base
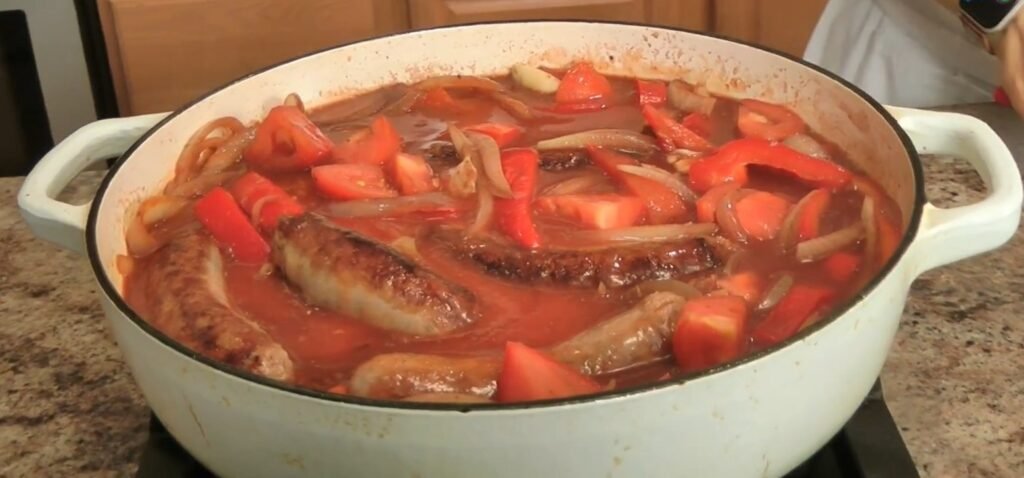
Incorporate any fresh tomatoes if you have a couple of chopped roma tomatoes on hand, though the provided tomato sauce will suffice for a robust base. Let them cook for 2 minutes to break down slightly. Now, pour in 1/2 cup of red wine to deglaze the pot, scraping up all the delicious browned bits from the bottom with a wooden spoon. These bits, known as fond, are packed with umami flavor.
Allow the wine to reduce by half, about 3 to 4 minutes, concentrating its fruity notes without letting it evaporate completely. In a small bowl, mix 1 tsp granulated garlic and 1 tsp Italian seasoning with a bit of the beef stock to dissolve, then stir this into the pot along with the full 1 1/2 cups beef stock and 2 cups tomato sauce. Taste and adjust with salt and pepper as needed. The beef stock adds a savory depth that complements the sausages perfectly, while the tomato sauce provides tanginess and body. Bring the mixture to a gentle simmer.
Step 4: Simmer the Sausages
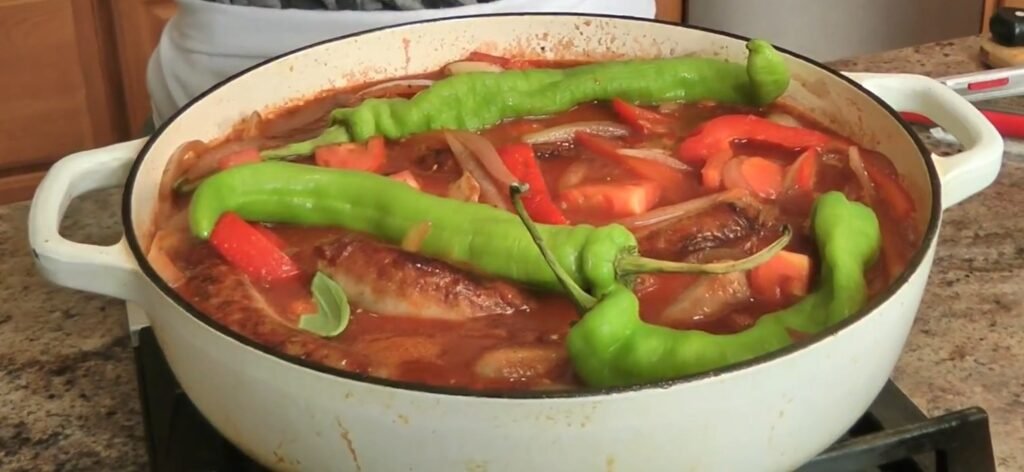
Nestle the seared sausages back into the pot, ensuring they are partially submerged in the sauce for even cooking. Surround them with the long hots if using, and tear in a few fresh basil leaves for herbaceous freshness. Cover the pot with the lid slightly ajar to allow steam to escape, preventing a watery sauce. Reduce the heat to low and let everything simmer gently for about 45 to 60 minutes.
Stir occasionally, and check the sausages for tenderness; they should be fully cooked through and infused with the sauce flavors. The low simmer thickens the sauce naturally, melding onions, peppers, garlic, and spices into a cohesive, velvety mixture. If the sauce reduces too much, add a splash of beef stock. This patient cooking step is key to achieving melt-in-your-mouth sausages and a sauce that clings beautifully to every bite. After simmering, taste again and adjust seasoning. Remove from heat and let rest for 5 minutes to intensify flavors.
Step 5: Make Garlic Parmesan Butter
While the sausages simmer, prepare the garlic butter for the rolls. In a small bowl, combine 8 Tbsp softened butter, 4 grated garlic cloves, a pinch of Italian seasoning, and 4 Tbsp freshly grated Parmigiano cheese. Mix vigorously with a fork until smooth and well-blended. The grated garlic infuses intense aroma, and the cheese adds nutty savoriness.
This compound butter turns ordinary rolls into garlicky perfection, mimicking restaurant-style garlic bread. Spread generously on the cut sides of your rolls later for maximum flavor. If any remains, store it in the fridge for future use on vegetables or pasta. Softening the butter at room temperature ensures it spreads evenly without tearing the bread.
Step 6: Toast the Rolls
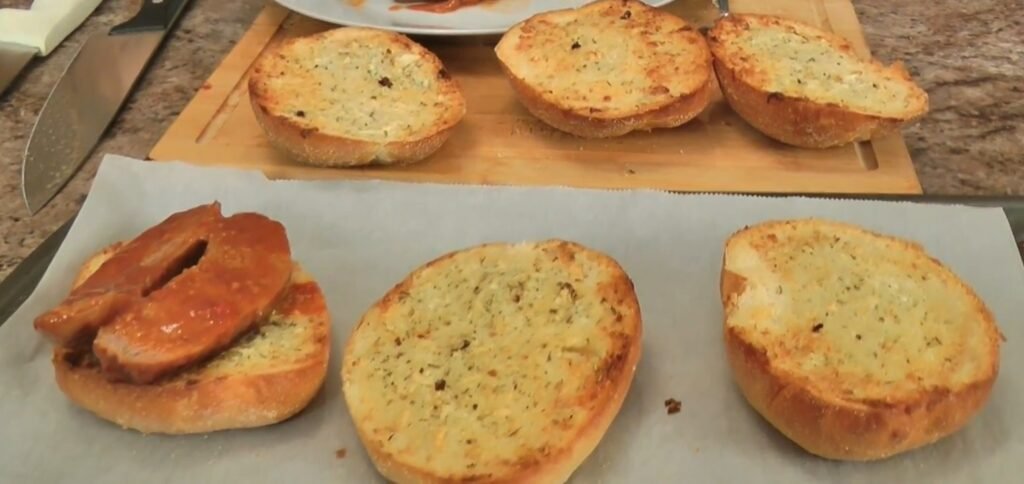
Preheat your oven to 400 degrees Fahrenheit. Split open 4 to 6 rolls depending on servings, and spread the garlic parmesan butter thickly on both cut sides. Place them butter-side up on a baking sheet and bake for 5 to 7 minutes until golden, crispy, and fragrant. Watch closely to avoid burning; the edges should be toasted to perfection. For extra indulgence, broil for the last 30 seconds. Remove and set aside. This step creates a crunchy contrast to the saucy filling.
Step 7: Assemble the Sandwiches
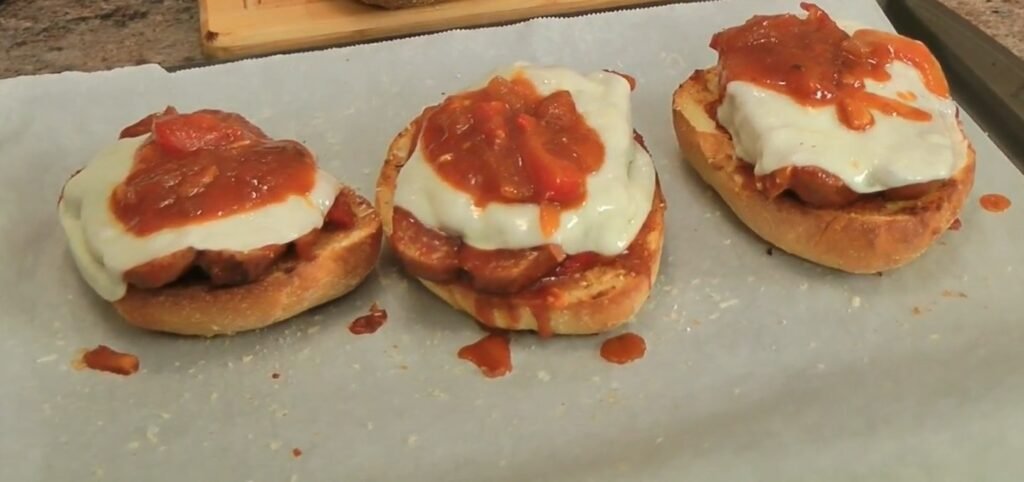
Split the sausages in half lengthwise for easier eating, especially on Kaiser rolls. Place the bottom halves of the toasted rolls on a baking sheet. Spoon saucy sausages onto each, topping generously with peppers, onions, and sauce. Add a slice of provolone cheese over each.
Return to the oven for 1 to 2 minutes until the cheese melts oozing. Drizzle more sauce on top, sprinkle extra Parmigiano if desired, and cap with the toasted roll tops. Serve immediately for the best texture. Long hots can be served on the side for spice lovers. Press down gently to let juices soak in.
Nutritional Information
| Nutrient (per sandwich, approx.) | Amount |
|---|---|
| Calories | 850 |
| Total Fat | 55g |
| Saturated Fat | 22g |
| Carbohydrates | 45g |
| Protein | 35g |
| Sodium | 1800mg |
*Estimates based on standard ingredient values; actual may vary. High in protein and fats from sausage and cheese.
Pairings
- Crisp green salad with vinaigrette to cut richness.
- Oven-roasted potatoes or fries for heartiness.
- Chianti or red wine to match sausage flavors.
- Coleslaw for creamy crunch contrast.
Variations
- Use chicken or turkey sausage for lighter option.
- Add cubanelle peppers instead of bell for milder taste.
- Swap provolone for mozzarella or skip cheese.
- Serve over pasta instead of rolls for non-sandwich version.
- Incorporate chopped tomatoes for fresher sauce.
Comprehensive Tips
Prep Smart: Pierce sausages before searing to avoid explosions and ensure even cooking; this releases pressure and allows sauce penetration. Slice onions and peppers uniformly for even sauteing, aiming for thin strips about 1/4-inch wide to soften quickly without sogginess.
Flavor Boosts: Smashing garlic whole keeps it mild and sweet during long simmers; chopping would make it pungent. Deglaze with red wine promptly after vegetables to capture all fond, enhancing umami tenfold. Taste sauce midway through simmering and adjust; beef stock adds meaty depth tomato sauce alone lacks.
Texture Perfection: Lid ajar during simmer evaporates excess liquid for thick, clinging sauce. Split sausages post-cook for sandwich fit; it exposes more surface for sauce absorption. Butter rolls heavily but evenly; room-temp butter prevents tearing delicate bread.
Make-Ahead Magic: Cook sausage-pepper mixture up to 2 days ahead; flavors deepen in fridge. Reheat gently on stovetop with splash of stock. Prepare garlic butter days in advance and store airtight; it freezes well for portioned pats.
Spice Control: Long hots infuse subtly whole; remove before serving if too hot, or chop for bold heat. Start with fewer for mild palates, adding more next time.
Serving Hacks: Use crusty rolls like Kaiser to hold saucy filling without falling apart. Melt cheese under broiler for bubbly top. Leftovers transform: shred for pasta, tacos, or pizza topping.
Common Pitfalls: Avoid high heat post-simmer; low and slow tenderizes without drying sausages. Do not overcrowd pot; sear in batches if needed. Salt veggies early to draw moisture, speeding caramelization.
Scaling Up: Double recipe easily in larger pot for crowds; simmer longer for thicker sauce. Freeze extras in portions for quick meals.
Diet Tweaks: Gluten-free rolls work seamlessly. Reduce butter for lighter version; still delicious toasted plain.