Ingredients
For the rolls
- 4 ounces cooked thin rice noodles
- Spring roll (rice paper) wrappers
- 1/2 lb cooked shrimp, shelled and deveined
- Thinly sliced vegetables of your choice (such as carrots, red cabbage, cucumber, bell pepper)
- Fresh mint leaves
- Fresh cilantro leaves
- Sliced scallions
- 2 tablespoons soy sauce
- 2 teaspoons light oil (such as light olive, canola, or vegetable oil)
- Squeeze of lime juice
For the peanut dipping sauce
- 1/4 cup natural peanut butter
- 1/3 cup hoisin sauce
- 2 tablespoons soy sauce
- 1 clove garlic, finely minced
- Drizzle of hot sauce (such as Sriracha)
- Squeeze of lime juice or a splash of rice wine vinegar
- 1 teaspoon sesame oil
- A few tablespoons of water, as needed to thin the sauce
Instructions
Start by making sure all your main fillings are cooked, cooled, and ready to go so that assembling the rolls becomes quick and enjoyable. If your shrimp are not yet cooked, boil or sauté them just until opaque and pink, then cool them completely before using so they do not soften the rice wrappers. Cook the thin rice noodles according to package directions, usually in boiling water for just a few minutes until tender, then drain, rinse under cold water, and set aside to cool so they do not clump together.
While the noodles cool, slice all your vegetables into thin, even strips or shreds so they lie neatly in the rolls and are easy to bite through. Carrots and bell peppers can be cut into matchsticks, cucumber into thin batons, and red cabbage into a fine shred so every roll gets a mix of color and crunch. Pat the shrimp dry with a paper towel, then slice them in half lengthwise if they are large, which helps them sit flat in the roll and gives a beautiful look through the translucent wrapper.
Step 2: Mix the peanut dipping sauce
The peanut-hoisin dipping sauce is what ties the entire dish together, so take a few minutes to get the texture and seasoning just right. In a small mixing bowl, add the natural peanut butter, hoisin sauce, soy sauce, minced garlic, sesame oil, a drizzle of hot sauce, and a squeeze of lime juice or rice vinegar. Use a whisk or fork to blend everything until it starts to come together; it will be quite thick at first, so do not worry if it looks stiff.
Begin adding water one tablespoon at a time, whisking after each addition until you reach a smooth, pourable consistency that still clings nicely to the rolls. The sauce should be creamy and glossy, not runny, so stop adding water as soon as it flows slowly off a spoon. Taste and adjust: add more lime or vinegar for brightness, extra soy for saltiness, or another small drizzle of hot sauce if you want additional heat. Set the finished sauce aside at room temperature while you assemble the rolls so it stays loose and easy to dip.
Step 3: Set up your rolling station
A well-organized rolling station makes the process neat, efficient, and much less intimidating, especially if you are making these rolls for the first time. Choose a large cutting board or clean countertop as your main work surface and keep a clean kitchen towel nearby to wipe your hands as you work. Place the cooled rice noodles, sliced vegetables, fresh mint and cilantro, scallions, and shrimp in separate small bowls or piles so you can quickly grab what you need without stopping to search.
Next, fill a wide, shallow dish or pan with very warm water; this is where you will soften each spring roll wrapper. The dish should be large enough to fit the wrappers flat; something like a pie dish, a large skillet, or a shallow baking pan works well. Keep another clean, slightly damp kitchen towel or a smooth, non-porous board beside the water to lay the softened wrappers on; a lightly damp surface prevents sticking while still giving you enough grip to roll tightly.
Step 4: Soften the spring roll wrappers
Working with one wrapper at a time is the key to avoiding tears and sticking, because the rice paper continues to soften even after it leaves the water. Slide a dry wrapper into the warm water and let it soak for about 10 to 15 seconds, gently turning it with your fingers until it feels pliable but is still slightly firm. The wrapper should not be fully soft in the water; it will continue to hydrate as you add the fillings and start to roll, which prevents it from becoming overly fragile.
When the wrapper feels flexible at the edges, carefully lift it out with both hands, allowing any excess water to drip off. Lay it flat on your damp towel or board, smoothing out any large wrinkles or folded edges with your fingertips. Work relatively quickly once the wrapper is on your surface, because if it sits too long without filling, it can become overly sticky and harder to handle.
Step 5: Layer noodles, vegetables, and herbs
Building each roll in layers helps you distribute flavors and textures evenly so every bite is balanced and satisfying. Start by placing a small bundle of cooled rice noodles in the center of the wrapper, slightly closer to the edge nearest you rather than directly in the middle; this positioning makes rolling easier. Use just enough noodles to form a modest log, as overfilling will make the rolls difficult to wrap and more likely to tear.
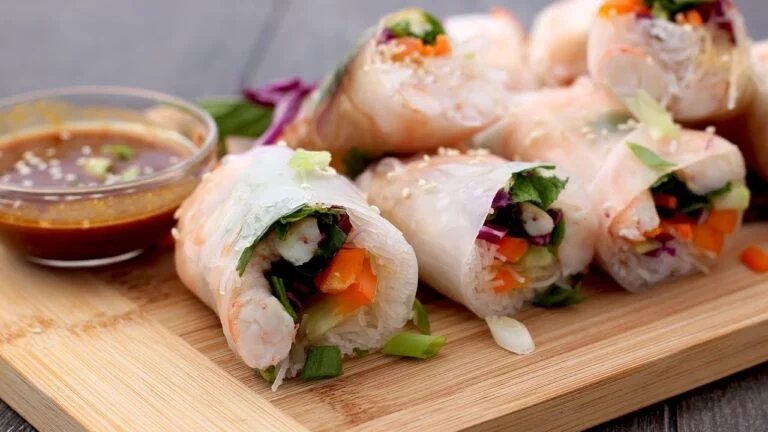
On top of the noodles, arrange a small handful of your thinly sliced vegetables—carrots, red cabbage, cucumber, and bell pepper—creating a colorful stack. Add a few mint leaves, some cilantro sprigs, and a sprinkling of sliced scallions to bring in fresh, aromatic flavor that brightens the rich peanut sauce. Keeping the filling relatively compact and horizontal across the wrapper will help you achieve a tight, uniform roll.
Step 6: Add the shrimp and seasoning drizzle
The shrimp not only provide protein but also give the rolls a beautiful, restaurant-style presentation when arranged thoughtfully. Place the shrimp pieces just above or directly on top of the vegetable and noodle layer, lining them up in a neat row with the pink side facing down so it shows through the finished wrapper. If you have split larger shrimp in half, place the curved edges outward so they create a visually appealing pattern once the roll is complete.
At this stage, lightly drizzle the filling with a bit of soy sauce, a few drops of light oil, and a squeeze of lime juice to season everything inside the roll. This simple mix adds extra moisture and flavor so the rolls taste delicious even before dipping. Be careful not to overdo the liquid, as too much can make the wrapper slippery and harder to seal.
Step 7: Roll the summer rolls tightly
Rolling the summer rolls is similar to rolling a burrito, and with a few deliberate moves, you can achieve neat, tight rolls that hold together well. Begin by lifting the edge of the wrapper closest to you and folding it up and over the filling, tucking it snugly underneath the noodles and vegetables with your fingers. This first fold should be firm but gentle, compressing the filling slightly so the roll feels compact without tearing the wrapper.
Next, fold in the left and right sides of the wrapper toward the center, just like folding in the sides of a letter, to encase the ends of the filling. Once the sides are in, continue to roll the wrapper away from you, keeping the roll tight and using your fingers to guide the filling into a uniform cylinder as you go. When you reach the far edge, the wrapper will naturally seal on itself, thanks to its stickiness; place the finished roll seam-side down on a plate or tray. Repeat this process with the remaining wrappers and fillings, keeping completed rolls in a single layer so they do not stick together.
Step 8: Serve, store, and expert tips
To serve, transfer the rolls to a platter and present them alongside a bowl of the peanut dipping sauce so each person can dunk generously. The rolls are best enjoyed freshly made, when the wrappers are soft and the vegetables are at their crispest, but they can be chilled briefly if needed. If you plan to hold them for a short time, cover them with a slightly damp paper towel and plastic wrap to prevent the wrappers from drying out or sticking.
For the best texture, avoid over-soaking the rice paper; it should feel pliable yet slightly firm coming out of the water so it softens gradually as you fill and roll. Keeping all your fillings cool helps the rolls feel refreshing and also prevents condensation from making the wrappers gummy. If you are serving a crowd, you can double the sauce recipe easily and even thin a portion a bit more to drizzle over the rolls in addition to using it as a dip. Feel free to play with variations by swapping in different vegetables, adjusting the amount of heat in the sauce, or adding extras like lettuce or avocado, while keeping the core method the same for consistently beautiful, flavorful summer rolls.
- Prep Time: 20 - 45 Mins
- Cook Time: 5 Mins